| The DSREPAIR Utility 
The DSREPAIR utility enables you to monitor NDS, check for errors, and correct problems in the name service on an individual server basis. The utility runs as a NetWare Loadable Module (NLM) at the server console. The utility is menu driven and is written with the well-known C-worthy user interface. The following are the main functions of DSREPAIR:
- Correct or repair inconsistencies in the NDS database
- Check NDS partition and replica information and make changes where necessary
- Initiate replica synchronization
You can run the DSREPAIR utility on any NetWare 5 server in the NDS tree. Additionally, the utility can either be loaded at the server console or through access a server via the RCONSOLE utility.
Figure 1 illustrates the DSREPAIR utility's main menu.
Figure 1: The DSREPAIR utility main menu.
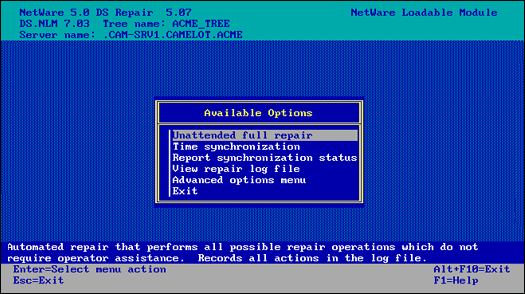
The DSREPAIR utility provides the following options:
- Unattended Full Repair. This feature automatically performs repair operations on the local NDS name service without operator assistance.
- Time Synchronization. This option checks the time synchronization for all servers that are known to the local server. You must monitor and correct time synchronization problems before performing any repair operation. A replica of the [ROOT] partition must be on the local server running DSREPAIR for this feature to contact all servers in the tree.
- Report Synchronization Status. This option lets you check the status of any partition on the server.
- View Repair Log File. This option lets you view all the operations of the DSREPAIR utility by consulting a log file stored on your server. The default log file is SYS:SYSTEMDSREPAIR.LOG. You should always view the log file after running the utility.
- Advanced Options Menu. The advanced options on this menu give you greater flexibility to manually control the repair of your NDS tree.
These options are discussed below.
The Unattended Full Repair option automatically performs all possible repair operations that do not require operator assistance. This option goes through five major repair procedures:
- It repairs the local NDS database, which locks the database during the repair operation so that no new database updates can occur until completed.
- It repairs any NCP server object's network address; the database is not locked during this operation.
- It verifies all remote NCP server object IDs; the database is not locked during this operation.
- It checks replica rings; the database is not locked during this operation.
- It authenticates every server in the ring and verifies information on the ring.
You can control which of the preceding items are checked or repaired by using the Repair Local DS Database option, which is described later in this AppNote under the "Advanced Options Menu" section. Refer to the Repair Local DS Database selection screen for more information.
The log file records all the actions during the Unattended Full Repair operation. When the repair operations are completed, the log file is opened so you can see what repairs were made and check the current state of the database.
The Time Synchronization option contacts every server known to the local server and requests information about time synchronization, Directory Services, and server status. The information is written to the log file. When the operation has completed, the log file is opened so you can check the status of time synchronization plus other Directory Services information. Figure 2 shows the log file after the time synchronization operation has been run on the ACME tree.
Figure 2: The log file after the time synchronization operation has been run on the ACME tree.
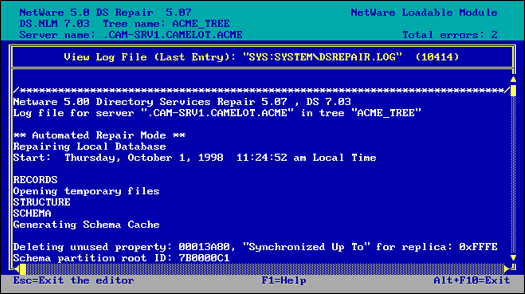
An explanation of each field in this log file is provided in Figure 3.
Figure 3: Fields in the DSREPAIR log file.
|
Field
|
Content
|
|
Server Name
|
The distinguished name of the server responding to the request.
|
|
DS.NLM Version
|
The version of Directory Services (DS.NLM) running on the responding server. This information is valuable as a quick reference to see the versions of NDS running on the servers of your network.
|
|
Replica Depth
|
The replica depth indicates how deep in the NDS tree moving away from [ROOT] the first replica is on the responding server. Each server knows which replica is highest in the NDS tree. This value is the number being reported. A positive number indicates how many objects there are from the [ROOT] to the highest replica. A value of -1 indicates that no replicas are stored on the server.
|
|
Time Source
|
The time source is the type of time server the responding server is configured to be.
|
|
Time is in Sync
|
This field indicates the time synchronization status of the responding time server. The possible values are Yes and No. The value displayed is the status of the synchronization flag for each server. This means that the server's time is within the time synchronization radius.
|
|
Time Delta
|
This field reports the time difference, if any, from the time synchronization radius for each server. The time synchronization radius is 2 seconds by default, so you will probably not see a server with more than a 2-second difference. If the value is larger, the Time is in Sync field is probably set to No. The maximum the field can report is up to 999 minutes and 59 seconds.
|
The Report Synchronization Status option starts a replica synchronization process for all the partitions that have replicas on this server. This operation starts the synchronization process for all partitions and replicas. If you want to perform the same operation for individual partitions, you need to select the Replica and Partition Operations option from the Advanced Options menu.
The Replica Synchronization operation contacts each server in each of the replica lists stored on the server. A server does not attempt to synchronize to itself, so the status returned for a server's own replica is the value of "host."
The operation uses the log file to track the actions of the requests and displays any errors that occur. This operation is a quick and easy way to determine that the partitions and servers are communicating and synchronizing properly.
The View Repair Log File option lets you view the DSREPAIR log file, which contains the results of the previously performed operations. The default log file is stored in SYS:SYSTEMDSREPAIR.LOG. When DSREPAIR performs an operation, the results are written to this log file. A record of each succeeding operation is appended to the log file, which increases in size with each repair operation. The size of the log file is displayed on the title line in parentheses after the name of the file.
Using the advanced options menu in DSREPAIR (discussed next), you can set the current log file size, reset the log file, log output to a new file name, or append to an existing file.
The Advanced Options menu enables you to control the individual repair operations manually. You can also use it to monitor status and access diagnostic information about your NDS tree. These options provide advanced repair operations that you should execute only if you understand the procedures and how they function. The Advanced Options menu provides the options shown in Figure 4, several of which are identical to the main menu options.
Figure 4: The Advanced Options menu in DSREPAIR.
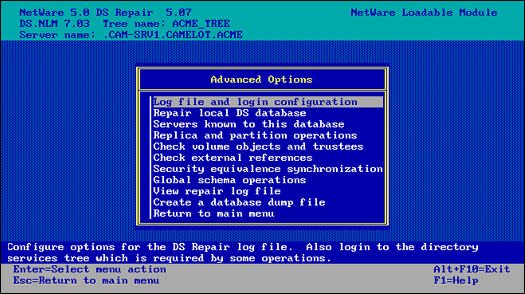
Log File and Login Configuration. This option lets you configure the log file and log in to the Directory tree. Configuring the log file enables you to manage where DSREPAIR writes the information it gathers. You can turn the log file off, delete it, and change the name of the file itself. The file can be stored on any volume or DOS drive.
The login function presents a login screen that lets you enter an administrator user name and password. Once you have logged in, the authentication information is maintained in server memory for all other repair operations that require an administrator to log in.
Repair Local DS Database. This option repairs the local NDS name service and performs the same function as the Unattended Full Repair option in the main menu. Figure 5 shows the Repair Local Database Options screen. You can select or deselect each item to turn it on or off for the unattended full repair.
Figure 5: The Repair Local Database Options screen.
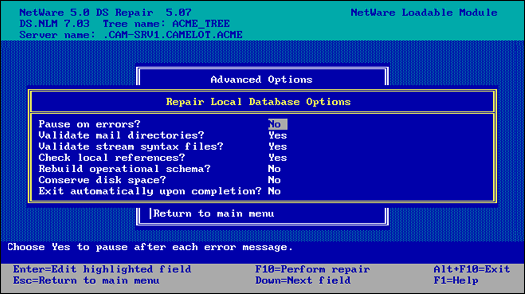
During the repair operations, NDS is temporarily locked, preventing clients from logging in. Several items are checked during the repair operation. For example, the NDS tree structure is checked to ensure that all records are linked to the [ROOT] object and that the object and property records are linked. The partition records are checked for validity and any errors are fixed. A check is made for invalid checksums and links between records and any errors are fixed.
The repair operation creates a set of temporary NDS files that are used to perform all the changes. The temporary files have the .TMP extension. At the end of the repair operation these temporary files become the permanent NDS files, unless you choose not to accept the repairs that were made.
Descriptions of the Repair Local DS Database options are listed in Figure 6.
Figure 6: The Repair Local DS Database options.
|
Option Name
|
Default
|
Description
|
|
Pause on errors?
|
No
|
Turn on this option if you want DSREPAIR to stop on errors. After the repair is complete, you can view all actions it performed in the log file.
|
Validate mail
directories?
|
Yes
|
This option checks the mail directories on volume SYS for users who no longer exist after the repairs have been made. NDS does not require the user to have a mail directory. The mail directories are migrated from NetWare 3 to support bindery users in NetWare 5.
|
|
Validate stream
syntax files?
|
Yes
|
This option checks for valid stream files after the syntax repair operation. Stream files contain data for a property whose data type syntax is stream, such as a login script. The files are associated with a specific user object or other object. If the user (or other object) no longer exists in NDS, the stream files associated with the user (or other object) are removed.
|
|
Rebuild operational schema?
|
No
|
The operational schema is the set of rules that NDS uses to objects and properties. The schema is required for base operations. If the schema becomes damaged or corrupted, you should rebuild it using this option. However, it is extremely unlikely that this situation will arise.
|
|
Conserve disk space?
|
No
|
DSREPAIR creates temporary copies of the NDS files and operates on these files. You can choose to save or discard the changes after a repair has completed. If you save the changes by leaving this option set to No, the temporary files become the real NDS files and the current NDS files are assigned the .OLD extension. This ensures that DSREPAIR has an old set of files that Novell technical support can review in case of emergency. The drawback to saving at least one old copy of the NDS files is that it takes up a little more disk space. In most cases this will not be an issue because the NDS files don't take up a large amount of disk space.
|
|
Exit automatically upon completion?
|
No
|
This option lets you look at the log file before saving the changes to the repaired NDS files. If you choose Yes, the utility automatically saves the changes and exits DSREPAIR.
|
Servers Known to This Database. This option displays all the servers that the local NDS knows about. Each server must contact all servers in the replica list during replica synchronization. The local server will only know about the servers it needs to contact. If the local server has a copy of the [ROOT] partition, the list of known servers most likely contains all the servers in the tree.
Figure 7 shows the Servers found in this Directory Services Database screen. This information shows servers from replica lists, servers from remote/local IDs, and NCP server objects in any partition.
Figure 7: The Servers found in this Directory Services Database screen in DSREPAIR.
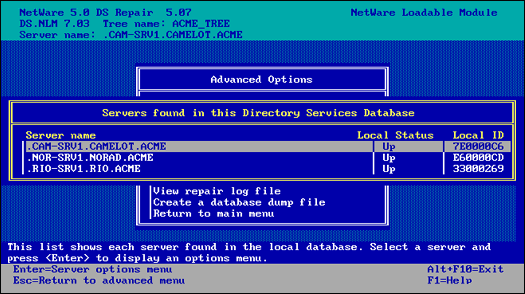
The Local Status field displays the state of the server as seen from the local server. If the value for a server is Up, the remote server is active. However, if the value is Down, the local server cannot communicate with the other server.
If you can select a server from the list, the Server Options menu shown in Figure 8 becomes available. This menu applies to the selected server.
Figure 8: The DSREPAIR Server Options menu.
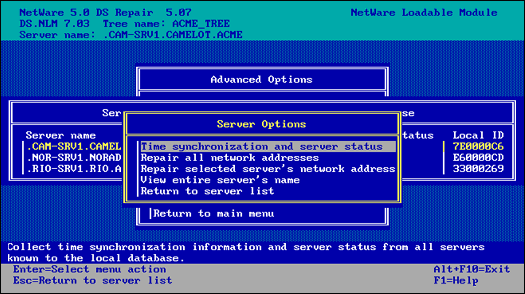
The Server Options menu provides the following options:
- Time Synchronization and Server Status. This option contacts every server known to the local server and requests information about time synchronization, Directory Services, and server status. This option is the same as the Time Synchronization option on the main menu.
- Repair All Network Addresses. This option checks every server object known to this server and searches for the server's name in the local SAP table. If the address is found in the SAP table, this address is compared with the value stored by the local server. If the two addresses do not match, the address in the SAP table is assumed to be correct and the other addresses are changed to match it. This operation is performed if you select the Unattended Full Repair option from the DSREPAIR main menu.
- Repair Selected Server's Network Address. This option repairs the highlighted server's network address in replica rings and server objects in the local database. As shown in Figure 9, you will see a log file displaying the results of this activity and any errors that may have been generated.
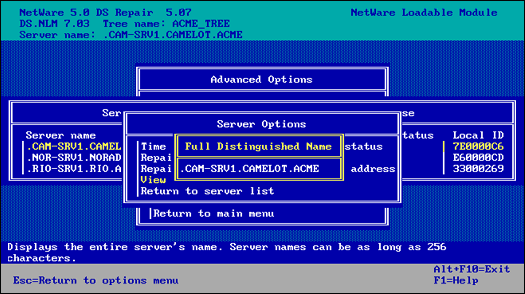
- View Entire Server's Name. This option allows you to view the server's distinguished name. Figure 10 shows a view of the server's full name from DSREPAIR.
Figure 9: The screen displayed when you select the "Repair selected server's network address" options in DSREPAIR.
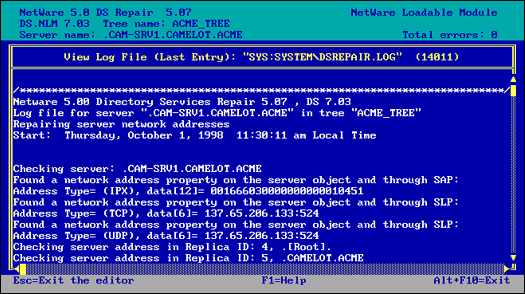
Figure 10: DSREPAIR can display the NDS Full Distinguidhes Name of the selected server.
Replica and Partition Operations. You should become very familiar with the Replica and Partition Operations option on the Advanced Options menu. You will use this menu more than any other menu during the maintenance of NDS. When this option is selected, DSREPAIR displays a list of all the replicas stored on the server. This list applies only to the server on which you are running DSREPAIR.
The menu option to view replicas is called Replicas Stored on this Server. Figure 11 shows the results from choosing this option. Each replica is shown in list format, with the replica type (master, read/write, read only, and subordinate reference) and replica state (On, Off, and so on).
Figure 11: The "Replicas Stored on this Server" list in DSREPAIR.
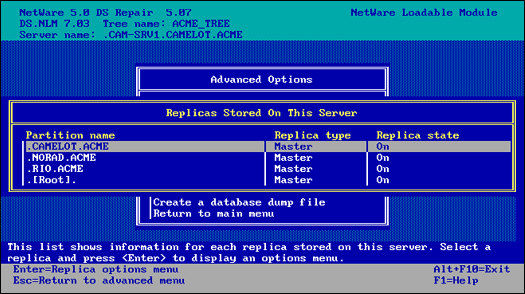
From the Replicas Stored on this Server list, you can select an individual replica or partition, which enables you to obtain more specific information and perform maintenance functions. After you select an individual replica or partition from the list, you'll see a larger Replica Options menu called Replica Options, Partition: <partition name>. Figure 12 shows this Replica Options menu. In the figure, the name of the partition is CAMELOT.ACME. This menu includes an extensive list of specific options and operations that enable you to perform specific diagnostic and repair functions. These operations apply only to the partition selected.
Figure 12: The Replicas Options menu in DSREPAIR for the CAMELOT.ACME Partition.
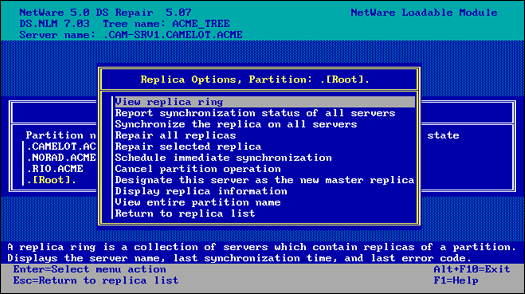
The Replica Options menu is the most heavily used menu in DSREPAIR because it enables you to monitor, diagnose, and repair specific problems with the replicas stored on a particular server. Several repair options in this menu require you to log in as a user who has rights to perform the operation. The utility requires you to log in before running all of the important repair options as a final check that you are authorized to perform the operation.
The operations in this menu affect the entire partition and all of its replicas. This is one place that the DSREPAIR utility can start operations on the other servers through the use of a replica list.
If you want to affect only the replica that is stored on a specific server, select the View Replica Ring option, select a specific replica on any server, and then perform partition and replica operations on only that server.
The Replica Options
The Replica Options menu supplies several additional options that you can execute for the partition and all of its replicas, as described below.
View Replica Ring. This option provides another menu or list of all the servers that contain replicas for the selected partition. The list that appears is called Replicas of Partition: <partition name>. A replica ring is equivalent to a replica list, which is a list of all the servers that hold replicas for a specific partition. The replica ring shows the replica type and replica state information for each server. You can choose a server or replica in this list and display the Replica of Partition: <partition name>
list, which provides more functionality on the selected server. Figure 13 illustrates information for the CAMLEOT.ACME partition.
Figure 13: Viewing the replicas of a partition in DSREPAIR.
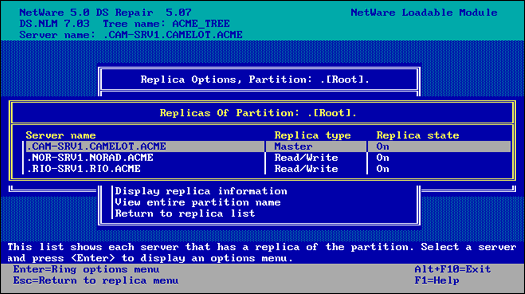
Selecting the View Replica Ring option will display the Replicas for Partition: <partition name>
menu, which supplies the following options, which affect only the selected partition:
- Report Synchronization Status of All Servers. This option checks the synchronization status of every server that has a replica of the selected partition. If all the servers with a replica response are synchronizing, the partition is functioning properly.
- Synchronize the Replica on All Servers. This option performs a synchronization of the selected partition on all severs that contain a replica and reports the status.
- Repair all replicas. This option performs a repair of all replicas on this server. This option also checks and validates the information on each server that contains a replica, as well as the IDs of both the remote and local servers. This is the same information that is checked when you select the Unattended Full Repair option from the main menu. In other words, you can run an Unattended Full Repair or a Repair Local Database instead of choosing the Repair All Replicas option.
- Repair selected replica. This option performs a repair on only the highlighted replica. This option is the same as the Repair All Replicas option, except that it repairs only the selected replica. Before choosing this option, you can run an Unattended Full Repair or Repair Local Database, both of which are equivalent to this operation.
- Schedule immediate synchronization. This option starts an immediate synchronization of all the replicas stored on this server. You can use this option to initiate synchronization activity if you want to view the Directory Services trace screen started by DSTRACE.
- Cancel partition operation. This option attempts to cancel a partition operation that was started for the selected partition. This operation talks to the master replica, which is responsible for the partition operations. Some partition operations may not be canceled if they have progressed too far. Other partition operations, such as the Add Replica Partition operation, cannot be canceled.
- Designate this server as the new master replica. This option designates the local replica of the selected partition as the new master. Each partition can have only one master replica, so the previous master replica is changed to a read/write replica.
This option is useful for designating a new master replica if the original one is lost. This situation may arise, for example, if the server holding the master replica has a hardware failure and will be down for a while or indefinitely.
- Display Replica Information. This option displays the distinguished name for the selected replica.
- View entire partition name. This option will display the full distinguished name of the selected partition.
The Rest of the Advanced Options
Now let's return to our discussion of the items listed in the Advanced Options menu (shown previously in Figure 4).
Check volume objects and trustees. This option will check all mounted volumes on this server for valid volume and trustees on the volumes. This option requires you to log in as the Admin user before performing this operation.
Check external references. This option will check each external reference object to determine if a replica containing the object can be located. If all servers that contain a replica of the partition where the object resides are inaccessible, the object will not be found during the check and a warning message will be issued.
Security Equivalence Synchronization. This option allows synchronization of security equivalence properties throughout the global tree. This operation walks the Directory tree, checks each object for the Equivalent To Me property, and checks it with the corresponding Security Equals property on the referenced object.
You should never have to run this option if you are using the standard NetWare security and rights administration. The Equivalent To Me property is not used by default. Enabling this option can cause performance degradation on your server.
Global Schema Operations. This option checks that all servers in the NDS tree contain the correct schema up to the NetWare 5 base schema. If a NetWare 5 server does not contain the correct schema, it will be updated.
After you select the Global Schema Operations option, you are provided with the following methods for updating the schema:
- Update All Servers' Schema. This option updates the schema on all servers in the tree and is useful for updating previous versions of NetWare 5 or NetWare 4 (4.0, 4.01, 4.02, 4.1, 4.11) to the current NetWare 5 schema.
- Update the [ROOT] Server Only. This option updates the schema on the server that contains the master replica of the [ROOT] partition.
- Import Remote Schema. This option is used for equalizing the schema before merging two trees.
View Repair Log File. This option allows you to manage the log file created when you run the other DSREPAIR options. The default log file is SYS:SYSTEMDSREPAIR.LOG. When DSREPAIR is loaded, the log file is opened. When repair operations are performed, the activity is appended to the log file. The size of the file is displayed within parentheses on the far right side of the title line. You can use this option to control the log file. For example, you can turn the log file off, turn it on again, change the file name, and change its location. You can place the log file on a NetWare volume or on
a DOS drive.
Create a Database Dump File. This option lets you copy the NDS files to disk in a compressed format to be used by Novell technical support. Creating a dump file can be useful for diagnostic and troubleshooting efforts. However, note that the dump file is not a backup that you can restore later.
When you select this option, you are asked to enter the path name for a dump file. The default is SYS:SYSTEMDSREPAIR.DIB. The dump file can be written only to a NetWare volume and not to a DOS drive.
| 


