| Perform Remote SuSE Installations With Virtual Network Computing 
Posted: 18 Jul 2005
A Server Too Far
Anyone who's done more than a few server installations knows what a tedious
process of point-click-wait-type-wait some more it is. Worst of all, you are
often glued to the physical console of the machine during this entire process,
which can be quite noisy and inconvenient in some environments (data centers,
for example). For companies with geographically distant campuses, this means an
experienced SuSE technician (read: you) has to be on-site to supervise the
install, which may cost you only your sanity, but it costs your company
significantly in transport costs, lost labor time due to travel, lodging, and
travel pay, inflating the TCO (Total Cost of Ownership) for your system
unnecessarily.
Wouldn't it be nice if you could simply dispatch an intern to power on the
system and stick in the install disk, type a few initial commands, and you could
do the rest from your nice cozy office chair hundreds of miles away? Even
better, what if all Mr. intern had to do was plug in the power and network
cables to the server, and you choose when to power on the server and begin the
install process remotely? For the intern, it sure beats coffee runs, and saves
you a cross-town or even cross-country trip just to do a routine server
installation.
In SuSE, you can, thanks to a collection of open source, standards-based
tools. The primary focus in this article is on Virtual Network Computing (VNC).
Using VNC to complete remote installations is actually very simple, but
achieving a truly hands off, remote installation requires a little preparation.
The first half of this paper will focus on running a simple installation using
VNC , using a VMWare guest as an example. The second half will detail the
process of running an installation on a remote system without the administrator
needing to touch the machine.
VNC Overview
VNC is a technology developed originally by AT&T and has been available
open source since 1998. VNC allows a user to control a remote system over a
network. VNC is available for multiple platforms including Windows, Linux,
Solaris, most BSD variants, and most UNIX variants. It is a very compact and
useful tool for remote administration.
The remote installation is accomplished with the following steps:
-
Boot the machine with the SuSE installation media.
-
Launch the install with the vnc=1 parameter, which directs linuxrc to
launch the VNC server
-
Use a VNC viewer to access the target system and complete the
installation.
VNC viewers can be found for most operating systems. SuSE LINUX distributions
come with the popular VNC viewer TightVNC. TightVNC can also be downloaded from
http://www.tightvnc.org/. TightVNC.org
has downloads available for Windows, Linux, Unix, and for Java-enabled
devices.
SECURITY DISCLAIMER: VNC is unencrypted by default, so anyone who has
access to the patch between you and the server and a decent packet sniffer can
capture your sessions and extract passwords, server settings, or other entered
data. Therefore, it is highly recommended that you only perform unsecured VNC
installations over a trusted network or in a VMWare environment. There are ways
of securing VNC (SSH Tunnels for instance), but those are outside the scope of
this document. For more information about securing VNC connections with SSH, see
Using SSH with VNC
(http://www.uk.research.att.com/archive/vnc/sshvnc.html).
Install SuSE LINUX As A VMWare Guest Using VNC
Installing SuSE LINUX in a VMWare virtual machine is a great way to get a
machine that can be used for testing, development, and debug work in a low risk
environment.
A common problem with installing SuSE LINUX in VMWare occurs when the
graphical YaST install starts. The display sometimes turns black, with nothing
displayed. Other times the YaST display will be quartered and display four times
on the screen.
Faced with this situation a use can do a number of things, including the
following:
Other options exist, but we'll focus on the two listed. To run a text-based
install, do the following:
-
Insert the SuSE LINUX install CD in the system and power on the virtual
machine.
-
At the install screen, use the arrow keys to
select Installation (don't hit Enter
yet).
-
Select F2 and then select the Text Mode option.
-
Continue the installation as normal.
The text-based install presents the same configuration options as the
graphical install, and runs without problem in the VMWare system.
If a graphical install in VMWare is having troubles, the first thing to do is
lower the resolution and try again. Use the F2 key in the install screen and
select a lower resolution.
If the graphical install won't run at a lower resolution, performing the
install using VNC will allow the user to access the familiar graphical YaST
environment. To start the installation using VNC, do the following:
This demonstration will proceed installing SLES 9 as a VMWare
guest.
-
Insert and connect the SLES 9 installation media into the appropriate drive
and power on the virtual machine.
-
Use the arrow keys to highlight the Installation option in the main
menu.
-
Select an appropriate resolution for the installation. Keep in mind that
this resolution should not be greater than your workstation resolution and
optimally one step below, unless you enjoy constantly moving scrollbars back
and forth.
-
In the Boot Options prompt enter vnc=1
vncpassword=enter_a_password_here. The vnc parameter tells the
installation program, linuxrc, to load up the vnc server. The vncpassword
parameter is optional, but using a password prevents others from either
accidentally or deliberately jumping into your install process. You might as
well specify the vncpassword at this point, because Linuxrc will prompt if one
is not provided. Use a password that does NOT double as a system password (See
Security Disclaimer at the top of this document).
The install screen should look like this:

-
Press the Enter key to start the installation.
-
Linuxrc will ask if it should obtain an IP address through DHCP. If Yes is
selected, a DHCP address will be acquired and displayed. If No is selected,
the user is prompted for a static address. In either case, the user should
write down the IP address being used.
-
Linuxrc starts the VNC server and displays the following:
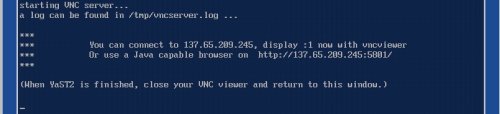
-
Connect to the virtual machine with a VNC viewer. For TightVNC on SuSE
LINUX, run vncviewer ip_address_of_vm:1.
-
When prompted, provide the vncpassword. The VNC viewer then loads and
displays the server's display.
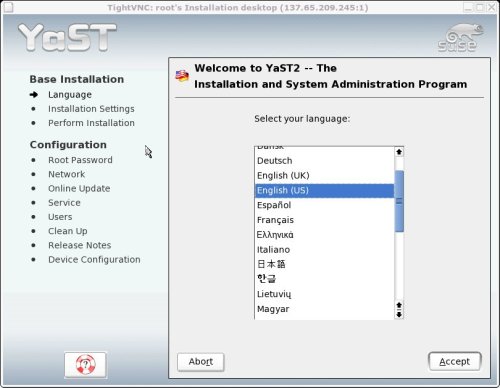
-
Complete the YaST install as normal, up to the file copy. During package
installation, connect the requested CD to the virtual machine as requested and
select OK in the VNC viewer to continue.
-
When file copy is complete, the VNC viewer closes and the virtual machine
reboots. Watch the virtual machine, it will restart the VNC server and the
YaST install and notify the user when to reconnect with the VNC viewer.
-
Reconnect to the virtual machine by running the VNC viewer with the IP
address and display as done previously (vncviewer
ip_address_of_vm:1).
-
Complete the install using the VNC viewer. The VNC viewer closes and the
virtual machine reboots upon completion.
You will notice that YaST doesn't configure X windows in this case. If you
want a graphical environment with X windows, you'll need to configure the
graphical environment after the installation. Switch to runlevel 3 and run
YaST2. Then configure the graphics card and display.
Perform a Hands-Off Remote Installation With VNC
The installation of SLES 9 in VMWare using VNC required hands-on interaction
at a few places---powering on the machine, entering boot parameters, switching
installation media, etc. In reality, the need for human-computer interaction can
only be eliminated with some highly complex installation routines. However, the
amount of knowledge required in the remote location can be reduced significantly
and control given to the remote administrator by combining technologies.
A number of remote installation tools are available. This section will focus
on creating an environment and performing an installation that minimizes the
amount of physical contact with the target system. Creating the environment and
performing the installation will require the following:
-
Create the environment
-
Installation source
-
tFTP setup
-
DHCP setup
-
Perform the installation
-
System preparation
-
Wake on LAN
-
PXE bootup
-
VNC installation
The remainder of this document will focus on installing a new headless SLES 9
server. The environment is simplified to illustrate the technologies being
used.
Create the Environment
Before installation of a headless server can be performed, the network
environment must be prepared. Specifically, three network components are
necessary to handle the installation. The three components are as follows:
-
Installation source---The new server will copy files from a network server
that contains the SuSE LINUX installation media.
-
tFTP---When the new server boots, it will pull a boot image from a tFTP
server. tFTP (trivial File Transfer Protocol) is essentially a stripped down
version of FTP that has very low overhead so it is suitable for transferring
boot images.
-
DHCP---The new server will receive an IP address and the location of the
tFTP server from the network DHCP server.
Installation Source
SuSE Linux Enterprise Server 9 provides a simple interface for preparing the
installation source through YaST. YaST can set up an installation server that
runs on one of three protocols---http, ftp, and nfs. The example setup will use
nfs.
To set up the installation server to provide the SLES 9 installation media
over nfs, perform the following:
-
In YaST, select Misc. > Installation Server
-
In the Initial Setup screen, select the source type. For this
example with nfs, select Configure as NFS source.
-
In the Initial Setup screen, provide the path where the
installation media will be stored. The specified path should already exist on
the server. For this example, a directory name install will be created under /
(root) and specified as the the directory to contain sources as /install/.
-
Select Next.
-
The NFS configuration screen appears, which allows the configuration of NFS
export options. The defaults will suffice for the example, so select
Next.
-
The Source Configuration screen appears, which allow the creation and
management of installation sources. To create a new source for SLES 9, select
Configure.
The following screen appears:
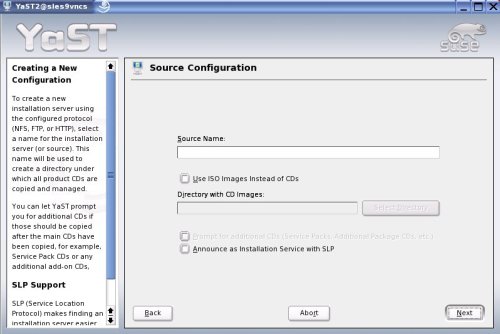
-
The Source Configuration window has the following items:
-
Select Next.
-
YaST will then copy the installation media to the path specified earlier.
Provide the appropriate media when requested.
-

When file copy is complete, YaST shows the configured
source as follows:
-
Select Finish to complete the installation server setup.
tFTP Setup
When the headless server boots, DHCP will tell it the name of a server and
location on that server where it should retrieve a boot image. The boot image is
delivered through tFTP.
To set up a SLES 9 server to provide the boot image, perform the
following:
-
Setup the tFTP server
-
In YaST, select Network Services > TFTP Server.
-
In TFTP Server Configuration, select Enable.
-
In TFTP Server Configuration, select Browse.
-
In the Browse window, create a folder in / (root) named
tftpboot.
-
Select tftpboot, and then select OK. The boot image directory
should now be /tftpboot/.
-
Select Finish.
-
Create the boot image in the /tftpboot directory
-
Insert SLES9 CD 1 into the CD drive and change directories to boot/loader
(e.g. #cd /media/cdrom/boot/loader).
-
Copy the files linux and initrd to the /tftpboot directory
(e.g. #cp linux initrd /tftpboot).
-
Using YaST, install the syslinux package. The syslinux package
contains the pxe boot image.
-
Copy the pxe boot image, pxelinux.0, to /tftpboot. (e.g. #cp
/usr/share/syslinux/pxelinux.0 /tftpboot).
-
Change directories to /tftpboot (e.g. #cd /tftpboot).
-
Create a directory under /tftpboot called pxelinux.cfg (e.g. #mkdir
pxelinux.cfg).
-
Change directories to pxelinux.cfg and create a default
configuration file called default (e.g. #cd pxelinux.cfg ; touch
default).
-
Edit the default file and add the following text:
#default
label
linux
kernel linux
append initrd=initrd ramdisk_size=65536
install=nfs://192.168.1.3/install/SLES9 vnc=1 vncpassword=install
Note: All of the text after "append" is one line. Also, be
sure to change the install and vncpassword parameters to fit your
environment.
When the new system boots, it will connect to the tFTP service to get its
boot image as defined in DHCP. The new system will also look in the pxelinux.cfg
folder for the default file. The default file specifies which kernel to boot and
appends the options indicating where the installation media is located and
telling linuxrc to start a vnc install. Note that you can specify any other
options you would normally put in the "Boot Options" field of a regular SuSE
install here. For more information about your choices, see the SLES9 Admin Guide
DHCP Setup
The network DHCP server needs to be configured to deliver two items---the
address of the tFTP server and the PXE boot image filename.
To add these items in SLES 9, do the following:
-
Start YaST, and select Network Services > DHCP Server.
-
Select Expert Options, and then select Yes.
-
In the Configured Declarations window, select the subnet
where the new system will be located and select Edit.
-
In the Subnet Configuration window, add an option and select
filename as the option to add. The filename option value
should be the name of the pxe boot image file, pxelinux.0.
Add another option, next-server, and set its value to the
IP address of the tFTP server.
-
Select OK.
-
Select Finish to complete the DHCP server configuration.
Perform the
Installation
With the network configured with DHCP, tFTP, and an installation source, new
systems can be installed. Performing the installation requires the
following:
-
System preparation
-
Wake on LAN
-
PXE bootup
-
VNC installation
System Preparation
Preparing the system is all of the physical contact with the system required
to perform the installation. The system should be assembled and placed into its
operating location. At a minimum the system should be plugged in and have its
network connections made.
The system bios should be set with a boot order that includes PXE boot. Do
not place the PXE boot ahead of the hard drive in the boot order. This will
result in a system that will try to reinstall itself every time it boots. If the
system will be woken up via the LAN connection, turn on wake on LAN in the
bios.
In order to wake the machine via wake on LAN, find and write down the
system's MAC address. Some manufacturers and resellers will send the MAC address
if requested.
Wake On LAN
Wake on LAN is a technology that allows a machine to be powered on via a
special network packet that is sent containing the target machine's MAC address.
Every network card in the world has a unique MAC address, so don't worry about
powering on another machine by accident.
If you are not on the same segment as the server, you will need to send the
WoL request either using multicast (which your network must support in order to
work) or by remotely controlling a computer on the same segment as the
server.
With SuSE LINUX, sending the wake on LAN packet is easy. Waking up the target
machine can be done in a few ways. The two options discussed here are:
-
YaST---On SLES 9, YaST has a network service called WOL. WOL is a graphical
utility that allows you to add systems by their MAC address and give them a
distinguising name. Once a system is added, the machine is powered on by
selecting its entry and then selecting Wake Up.
-
ether-wake---is a command line utility that can be installed using the YaST
software component. To wake up a system just enter ether-wake
MAC_address_of_system at the command line. For example, to wake up the
machine with MAC address 00:c0:4f:23:91:b4, enter ether-wake 00:c0:4f:23:91:b4
at the command line.
PXE Boot
When the target system receives the wake on LAN packet, it will power on and
try to boot. If the hard drive is empty, the PXE boot option in the boot order
will be reached. The system will attempt to retrieve a DHCP address. If the DHCP
server is working correctly, it will deliver an IP address and the location of
the PXE boot image on the network.
With an IP address and the location of the PXE boot image, the system will
boot using the PXE boot image and the parameters listed in the default file.
Note: It is possible to have a specific
configuration file used by the booting system. Doing so requires creating a
configuration file for the system named according to the systems assigned IP
address. This route also requires static address assignments. For more
information, see the PXE Linux documentation at
/usr/share/doc/packages/syslinux/pxelinux.doc.
In our example, the default file contains the boot options for the
installation source and the VNC install. The install will start from the source
and start the VNC installation.
VNC Installation
If the target system is far away, or not connected to a monitor, knowing when
the system is up and what IP address it is using is difficult to ascertain. VNC
advertises the install via SLP, so if the system has SLP set up or is on the
same subnet as the administrator's system, the install can be found by entering
the following command at the shell:
#konqueror service://YaST.installation.suse
Konqueror
will display all of the SuSE installations announcing themselves via SLP, like
in the following:

Clicking on the entry will start Konqueror's built in VNC viewer, where the
install can be performed. Alternatively, vncviewer can be ran with the IP
address listed and specifiying the display as :1.
The install then is completed as described previously except no CD media is
requested at file copy.
Conclusion
We hope that this document enlightens you to the many remote installation
possibilities available with the highly flexible SuSE Linux installation
program. Going further, it is possible using AutoYaST and a custom linuxrc to
perform a "metal-to-production" install, in which the server can be started up,
installed with specific packages, configured with custom settings to exactly how
is necessary, and begin running as production-ready, all without a single human
necessary during the installation process, cutting deployment time of a server
from half a day to half an hour.
Whatever path you decide to take, remote installations will save you time,
frustration, and ultimately cost your company less in deployment time, which
will make your accountants happy, and will free up more time for you to be doing
more important things, like making those interns do coffee runs!
|


