| Using openSSH to Securely Access Remote Systems 
Posted: 21 Jun 2005
Using openSSH to Securely Access Remote Systems
Applies To:
What is openSSH?
If you are new to Linux, you may not be familiar with Secure Shell (SSH). SSH provides a secure method to access a remote host in the styles
of telnet, rlogin, ftp, and others. With SSH, all communication between host and
client computers is encrypted, reducing the risk of having passwords or data
intercepted.
SSH in SUSE Linux is provided via the
openSSH package, which is installed by default on all Novell/SUSE products.
openSSH provides a daemon, sshd, as well as three clients: ssh, sftp, and
scp.
The ssh
client works much like telnet and rlogin---it allows
for remote login and execution of commands on a host system. The sftp client is
functionally similar to most command-line FTP clients. Lastly, scp allows files to
be copied to and from a remote host by using syntax similar to the cp
command.
Using openSSH
Installation
openSSH
should be installed and active by default on most Novell/SUSE Linux systems. The
exception is SUSE Professional 9.3, where, for added security, the SSH daemon is
disabled by default with SuSEfirewall2. You can enable the SSH daemon in two
ways: during system installation or by editing the firewall settings later.
Enabling SSH during system installation is done in the “Network Configuration”
screen. Click on “disabled” to
toggle SSH to “enabled” as shown
in Figure 1. To modify the
firewall settings later, enter the Security and
Users>Firewall module in YaST and enable
SSH under Allowed Services as
shown in Figure 2.
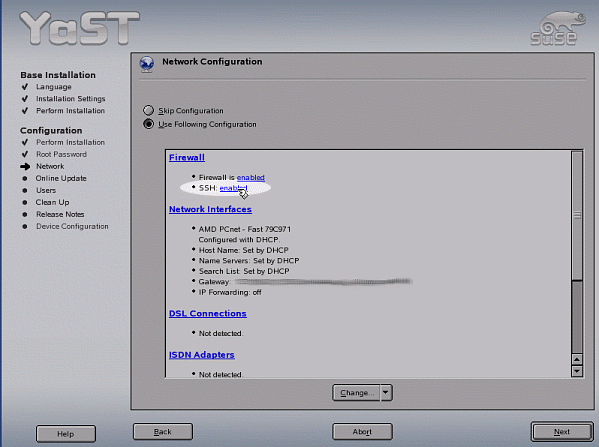
Figure 1: Enabling SSH Server During
Installation
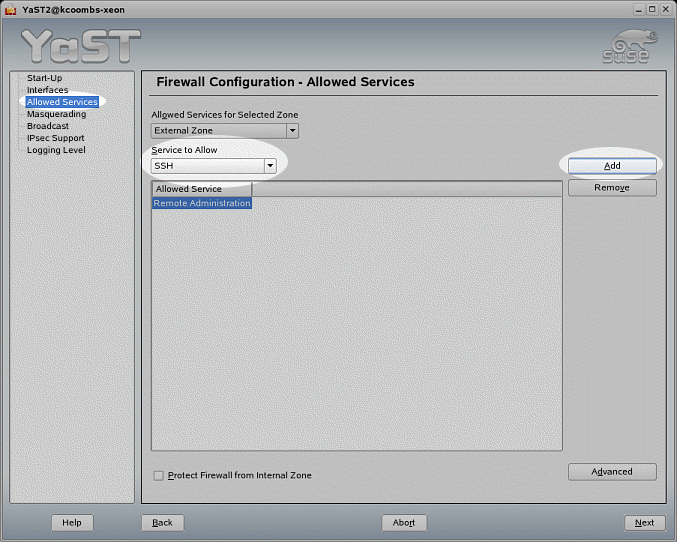
Figure 2: Enabling SSH Server After
Installation
If you did a custom install and openSSH was not
included, install it by performing the following steps:
-
Install
the openSSH package in YaST. If you only want the clients (ssh, sftp, and
scp),
you can stop here.
-
If you
want a SSH daemon, enable the service by using the System Services
(Runlevel) module in YaST, or type the
following as root:
# insserv /etc/init.d/sshd; rcsshd
start
-
Ensure that the SuSEfirewall2 allows SSH
connections as shown above.
RSA Keys
In
order to implement encryption, each computer running the SSH daemon must be
uniquely identified. This is accomplished with RSA keys. When the
sshd daemon is
started for the first time it generates a random key pair to identify the host.
The key pair is stored in /etc/ssh/. This key
has a public and private component. Together they allow data to be encrypted and
decrypted. When connecting to a host for the first time, the host's public key
is given to the client computer. SSH issues a message similar to the following:
The authenticity of host 'computer.site
(137.23.43.12)' can't be established.
RSA key fingerprint is
3f:20:b2:bb:d1:74:c3:35:f8:2e:99:e5:74:56:12:4c.
Are you sure you want to continue connecting
(yes/no)?
Typing
yes causes the hosts public key
to be placed in ~/.ssh/known_hosts
on the client. The next time the client connects, the key is read from this file
and the message is not displayed. Because the client now has the public key for
the host, encrypted communication is now possible.
If the public key for the host changes (i.e. if a
new key is generated or if the system is re-installed), SSH will issue a message
stating that the key has changed, which may be a sign of a security breach, and
will not let you connect. If you are certain everything is all right, simply
remove the old key from ~/.ssh/known_hosts on the client and try
again.
The openSSH clients
The openSSH clients are very flexible and have
many options. For basic usage, however, they are relatively simple.
ssh
The
ssh
client has the following general syntax:
ssh [options] [user@]hostname
For example, to login to host 137.23.43.12 as user
jdoe, type:
ssh jdoe@137.23.43.12
This can be simplified further. SSH automatically
uses the user name of the current user on the client if none is specified. This
applies to all the openSSH clients. For example, if the user is logged in as
jdoe on the client, and wishes to log in as jdoe on the host the command is:
ssh 137.23.43.12
If the key authentication goes successfully, you
are prompted to enter your password and are then presented with a console-login
to the remote server (see Figure 3). To close the connection, simply type
'exit.'
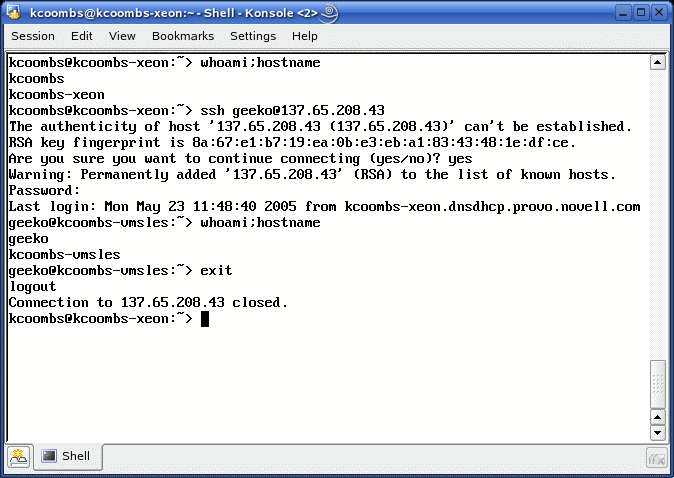
Figure 3: Sample ssh Session
ssh has two
important flags to remember: -X and -C. Using -X opens an x-tunnel with the
host. If an x-based application is launched on the host, it appears on the
client computer. The -C option causes all communication to be compressed with
the gzip algorithm. This increases the processor load of both the client and
host, but speeds communication. For example:
ssh -XC jdoe@137.23.43.12
sftp
The sftp
client works much like any other command-line FTP client. It has the basic
syntax:
sftp [options] [user@]hostname
Once connected, use the standard get, put, etc.
used with ftp. To exit your session, type
exit. Figure 4 shows a sample sftp session.
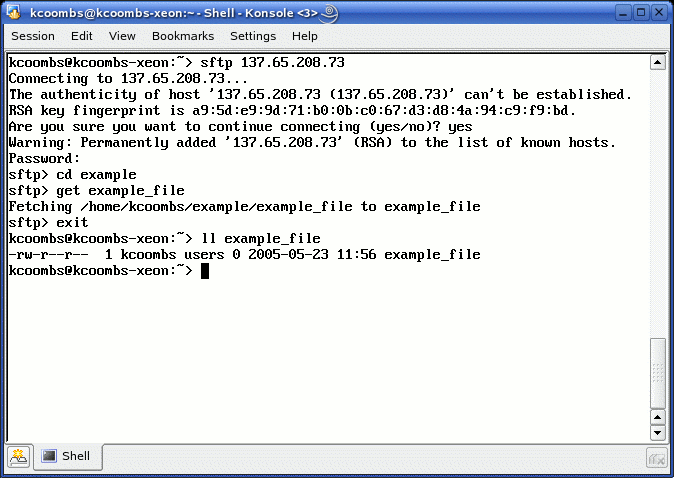
Figure 4: Sample sftp Session
scp
The scp
client allows for seamlessly copying files between a client and a host computer.
scp resembles the cp command in many
ways. Its general syntax is:
scp [options] [[user@]host1:]file1 [...]
[[user@]host2:]file2
For example, to copy the file foo from the
home directory of the client user to the root directory of the host
execute:
scp ~/foo
root@foo:/root/
or to do the opposite:
scp root@foo:/root/foo ~/
scp also
takes the options -r and -v for recursive and verbose operation. For example, to
copy the contents of /tmp/files on the host to /home/jdoe/files on
the client, and display all debugging information, type:
scp -rv
jdoe@137.23.43.12:/tmp/files/*
/home/jdoe/files/
Configuring password-less
Connections
Warning: The steps
described in this section introduce security risks.
At times it is desirable to establish connections between two computers that
do not require a password. With SSH, these connections are possible.
To establish password-less connections, one simply needs to notify the host
that their computer is a trusted client. This is done by generating a
public/private key pair on the client, and then giving the public key to the
host.
To do this, perform the following steps:
-
On the client computer, generate a public/private key. Type the following
as the user you intend to connect from:
ssh-keygen -t rsa -b 1024
-
You are prompted for a location to
save the key to. Press enter
to accept the default location (~/.ssh/id_rsa).
-
You are prompted for a passphrase.
Press enter twice for
none.
-
Your private key is saved to ~/.ssh/id_rsa, and your public key is saved
to ~/.ssh/id_rsa.pub.
-
Type the following to copy your public key to the host computer:
ssh-copy-id -i ~/.ssh/id_rsa.pub
user@hostcomputer
You are prompted for a password, the client's public key is copied to ~/.ssh/authorized_keys on the host. You are
then logged out.
You can add the client's public key to any user you wish on the host. The
current user on the client can then connect as any user on the host which has
this public key.
-
Now, ssh into the host computer
again. You are immediately be presented with the command prompt, without being
prompted for a password. If your client's key is ever changed, you will need
to replace the old public key in .ssh/authorized_keys on the host with new key
from the client.
| 


