| How to uninstall the Novell Client for Linux |
Posted: 15 Jul 2005
Applies To:
- Novell Linux Desktop 9
- SUSE LINUX Professional 9.3
Solution:
There are three supported ways for uninstalling the
Novell Client for Linux. These three methods are via Terminal, Yast2, or Red
Carpet. We will go over each one individually so that you can determine which
one fits your needs.
Uninstalling via the Terminal
-
Open a terminal.
-
Go to the source of your media. This could be a directory or CD depending
on whether you extracted it to a directory or burned to to a CD. Either way,
you should see a file called ncl_install. You will need to su to root in order
to run the uninstall. Start the uninstall by typing ./ncl_install uninstall and then press
enter.
-
When the uninstall has completed, you should see a message saying that the
"Uninstallation of the Novell Client for Linux completed
successfully."
Uninstalling via Yast2
-
Launch Yast2
-
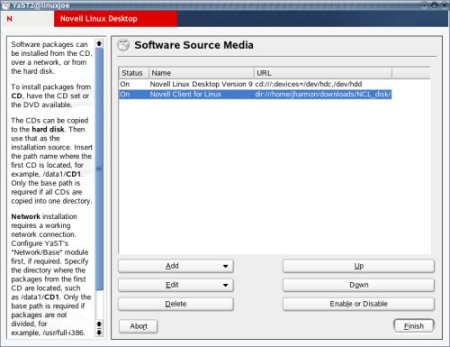
If you didn't install using Yast2, or if you are uninstalling with a newer
version of the client than you used during the installation, then you will
need to add the media as a source. This will allow the Novell Client for Linux
to show up as a selection under the Add and Remove Software module. To add a
software source, go to Software and click on Change Source of Installation.
Click on the 'Add' drop down menu and choose the location of your client
source. In this example I will choose the "local directory" option and browse
to the location of my NCL_disk directory. If you are using a CD then just
choose CD. Either way you should now see the Novell Client for Linux as a
source. Click Finish. If you already had a Novell Client for Linux source
listed, but you are using a newer version, then you will need to remove the
old source and add the new one in order for it to be recognized
properly.
-
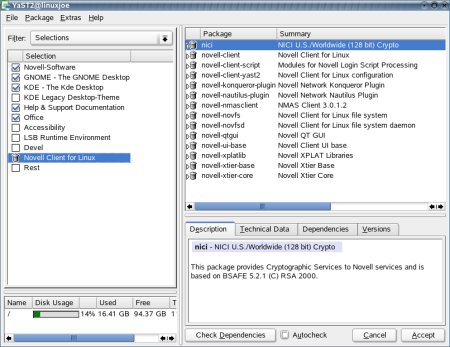
You should still have the Yast2 window open. Now go to Software and choose
Install and Remove Software.
-
Under the filter section choose the "Selections" option from the drop down
menu. In the bottom left hand pane you should see a Selection called Novell
Client for Linux. On the check box next to the "Novell Client for Linux"
selection, either click twice to change the check box to a trash can, or right
click on the check box and choose the 'Delete' option. You will see it will
place a trash can in front of all of the necessary packages on in the right
hand pane. If it doesn't, then you probably have a partial install of the
client and you might need to right click on each individually installed
package (in the right hand pane) and choose the 'Delete' option. Click
Accept to uninstall the client.
Uninstalling via Red Carpet
-
Launch Red Carpet
-
If you are subscribed to a Red Carpet service that has the client available
then you can just click on channels and select that channel. If you downloaded
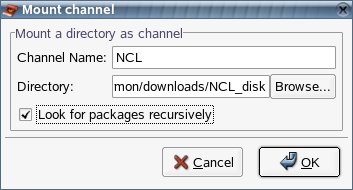
the client and want to create a channel on your local machine then you can
choose File | Mount Directory. In the dialog box put in the name of the
desired channel. In this example we will just call it NCL, but it can be
whatever you want to call it. Now click on the browse button and browse out to
either the CD media or the local directory where you extracted the client. Be
sure that you check the "Look for packages recursively" option. Then click OK.
You don't need to subscribe to the channel because anytime you mount a channel
manually, you are automatically subscribed.
-
Now go to the Search tab. In the Channel section choose the NCL
(or what ever you decided to name it) channel. You should now see a list of
all the of installed packages for the client.

-
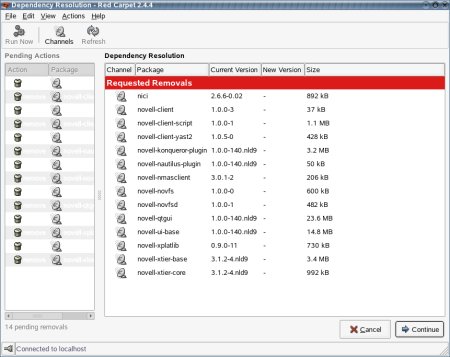
Either choose Edit | Select All, or press CNTL A to select all of the files
in that channel and then choose Mark for Removal. Now click the Run Now
button in the upper left hand corner.

-
After the dependency resolution occurs, press Continue.
|
| |