| An Introduction to LDAP: Part 2-Using LDAP to Create a User Authentication 
Posted: 22 Jun 2005
Applies to
What this article covers
This article
provides a practical example of how to utilize LDAP in a multi-platform,
multi-user environment. It explains how to use a SLES server, hosting a LDAP
directory, to create a unified login source and file server for both Windows and
Linux. On the Linux side, users authenticate directly with LDAP, and access
their home directories via NFS. On the Windows side, Samba is configured in
conjunction with LDAP to act as a Primary Domain Controller (PDC), serving user credentials and providing
roaming profiles. In addition, user information stored in the directory, such as
e-mail addresses and phone numbers, is made available as address books to
clients such as Mozilla
Thunderbird. Figure 1 outlines the
configuration.
Figure 1: The
configuration

The article walks
through the installation and configuration of a SLES 9 server that provides
these services. A SLES server that has already been installed can easily be
adapted as well. Doing so is not covered in-depth in this article, but pointers
are given that indicate how it can be accomplished.
What is
required
To accomplish the
tasks in this article, the following hardware and software is required:
-
A server on which SUSE LINUX Enterprise Server can
be installed. This server should either have a static IP
address, or be reachable via DNS. It should also contain enough hard-disk
space to provide storage for the users whose home directories are hosted on
the server.
-
One or more Linux
clients. This article describes Novell Linux Desktop.
-
One or more
Windows clients. This article describes Windows XP.
These computers
should all be networked and the clients should all be able to reach the
server.
Configuring the
SLES 9 server
This article
continues the example given in Part 1. In Part 1, LDAP
is introduced through a company called example.com, which has three departments:
Sales, Marketing, and Engineering. Each department has one or more
employees.
Install the base SLES
system
Begin by installing SUSE LINUX Enterprise Server 9.
No special installation settings are required, although it may be desirable to
make a separate partition for the user home directories. If the number of users
to be served is unknown and may grow significantly, it may be desirable to use
EVMS or LVM to create volumes that are expandable in the future. Use the default
package selections and begin the install. For more information on how to perform
a SLES install or use EVMS and LVM, see the SUSE LINUX Enterprise
Server Administration and Installation Guide.
Once the
packages have been installed and the system has been rebooted, the root password
is prompted for. Select a root password and continue. Next, a Network
Configuration module is displayed. Be sure to configure the networking to
use a static IP address so the server can be reached by the clients at all
times. It is also good to configure the server with a unique host name. In this
example, the server is configured with the static IP address 137.65.211.18, and
the host name ldapserver. In addition, the server is configured with the
example.com domain. The configuration is shown in Figures 1 and 2. When
completed, continue through the network connection test and updates.
Figure 2: Network
configuration: static IP address

Figure 3: Network
configuration: host name and domain name

The next module is the Service
Configuration module. This module
configures certificates and the LDAP server. Unless there are any special
situations, the default settings should be accepted. This creates an LDAP server
with the following settings:
-
Base DN:
dc=example,dc=com
-
Administrator:
cn=Administrator,dc=example,dc=com
-
LDAP password is
the same as the root password
Continue to the
next module, which configures the primary source of user authentication. Accept
the default selection (LDAP). This causes the LDAP Client module to be
launched next, which is where the server which was just installed is configured
as the user authentication source for this machine. Notice that the server base
DN is already filled in. Select Advanced Configuration. Notice again that
the information for the LDAP server is already filled in. One key setting to
note is the File Server check box, which should be selected, indicating
that all user files are stored locally on this machine.
Now, it is
important to consider the configuration of the LDAP users. On Linux, each user
is given a unique user id (UID). On most systems, system users, such as
root and ftp, have UID's lower than 1000, with the first real user
being 1000. Because LDAP users may be authenticated on any arbitrary Linux
client, it is important that the UID's of the LDAP users do not conflict with
the UID's of any local users on the clients. Thus, it is best to set the UID's
for LDAP users to begin at a number which will not conflict, such as 10,000. In
addition, users belong to one or more group, each with its own GID. It is
important the the GID's do not conflict either.
If the defaults
are accepted, then UID's begin at 1000 and GID's begin at 1000. De-select the
Create Default Configuration Objects check box, and select Configure User
Management Settings. A prompt asks whether
to place configuration objects in the directory, select yes. Next, add new configuration objects to the
directory. First, add a new group configuration object by selecting
new. Enter
groupconfiguration as the name
and select ok (see Figure 4). The
group configuration options are then displayed. Notice that the first GID is
1000. Most systems begin with 100, so this setting is fine. Select
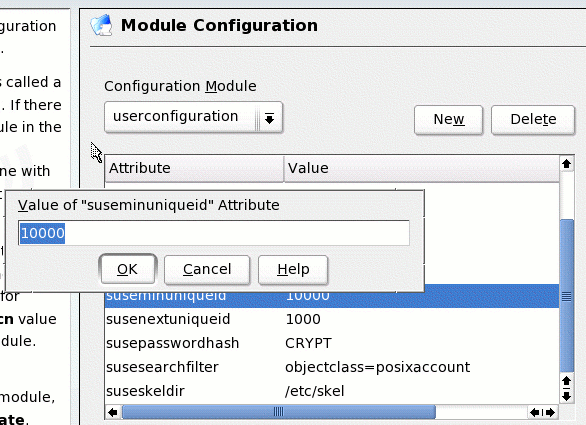
new then add a new user
configuration object, calling it userconfiguration. When its options are displayed, notice that the
UID's begin with 1000. Change suseminuniqueid and susenextuniqueid to 10000. See
Figure 5.
Figure 4: Adding
a new group configuration object
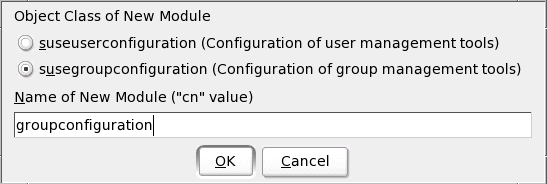
Figure 5:
Changing the UID settings
Select Next
several times to proceed to the next module.
It is now time to
add a user. Begin be adding a LDAP user to serve as administrative user for this
server. This example uses the user admin user, with the user name
admin. Fill in the fields, then select Details. Notice that the
UID for admin is 10000, as desired.
Next, consider the
user's home directories. By default, Linux systems place home directories at
/home/username. Because any arbitrary client can connect, there is no guarantee
that user names will not conflict with local users on the clients. It is simpler
to place the home directories of the LDAP users in another location, such as
/users. Change the home directory for the admin user to this location
(see Figure 6).
Figure 6: User
detail settings
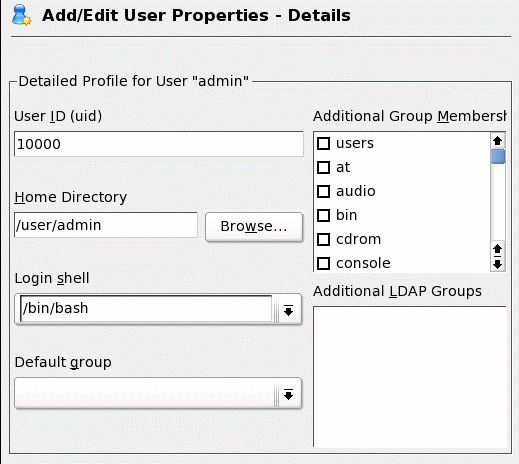
Also notice that the admin user is not a member of any group. No LDAP groups
exist yet, so admin cannot be
assigned to any. In this case, admin will default to the local users (GID=100) group when logging-in.
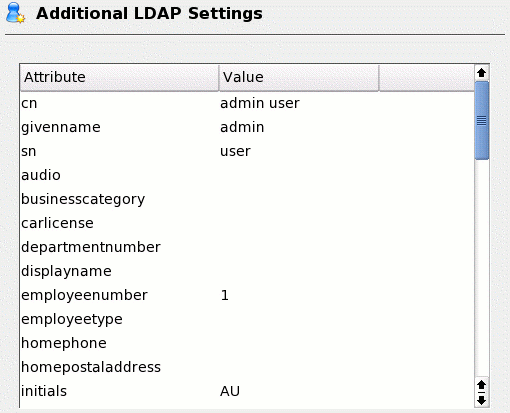
Then next screen
provides the option to configure additional modules. For example, launch the
Edit Remaining Attributes of LDAP User module. There are many different
attributes to define for the user, such as an e-mail address and phone number.
Fill in any desired information (see Figure 7). This information later drives
the LDAP address book.
Figure 7:
Additional LDAP settings
Continue through
the rest of the install. After the install is finished, log-in as the new LDAP
user. Now is a good time to look at what has happened. Open a terminal, and
bring up the entire contents of the directory by entering: ldapsearch -x -b dc=example,dc=com. Results
similar to the following are displayed:
# extended LDIF
#
# LDAPv3
# base <dc=example,dc=com> with scope sub
# filter: (objectclass=*)
# requesting: ALL
#

# example.com
dn: dc=example,dc=com
dc: example
o: example
objectClass: organization
objectClass: dcObject

# ldapconfig, example.com
dn: ou=ldapconfig,dc=example,dc=com
objectClass: top
objectClass: organizationalUnit
ou: ldapconfig

# groupconfiguration, ldapconfig, example.com
dn: cn=groupconfiguration,ou=ldapconfig,dc=example,dc=com
cn: groupconfiguration
objectClass: top
objectClass: suseModuleConfiguration
objectClass: suseGroupConfiguration
suseDefaultBase: ou=group,dc=example,dc=com
suseDefaultTemplate: cn=grouptemplate,ou=ldapconfig,dc=example,dc=com
suseMaxUniqueId: 60000
suseMinUniqueId: 1000
suseNextUniqueId: 1000
suseSearchFilter: objectclass=posixgroup

# userconfiguration, ldapconfig, example.com
dn: cn=userconfiguration,ou=ldapconfig,dc=example,dc=com
cn: userconfiguration
objectClass: top
objectClass: suseModuleConfiguration
objectClass: suseUserConfiguration
suseDefaultBase: ou=people,dc=example,dc=com
suseDefaultTemplate: cn=usertemplate,ou=ldapconfig,dc=example,dc=com
suseMaxPasswordLength: 8
suseMaxUniqueId: 60000
suseMinPasswordLength: 5
suseMinUniqueId: 10000
suseNextUniqueId: 10000
susePasswordHash: CRYPT
suseSearchFilter: objectclass=posixaccount
suseSkelDir: /etc/skel

# people, example.com
dn: ou=people,dc=example,dc=com
objectClass: top
objectClass: organizationalUnit
ou: people

# group, example.com
dn: ou=group,dc=example,dc=com
objectClass: top
objectClass: organizationalUnit
ou: group

# admin, people, example.com
dn: uid=admin,ou=people,dc=example,dc=com
businessCategory: Administrator
cn: Geeko Novell
employeeNumber: 1
gidNumber: 100
givenName: admin
homeDirectory: /users/admin
initials: AU
loginShell: /bin/bash
mail: admin@example.com
objectClass: top
objectClass: posixAccount
objectClass: shadowAccount
objectClass: inetOrgPerson
shadowInactive: -1
shadowLastChange: 12951
shadowMax: 99999
shadowMin: 0
shadowWarning: 7
sn: user
uid: admin
uidNumber: 10000

# search result
search: 2
result: 0 Success

# numResponses: 8
# numEntries: 7
Notice that the
directory contains:
-
Organizational
units in which people and groups are stored (dn: ou=people,dc=example,dc=com
and dn: ou=group,dc=example,dc=com).
At this point,
three major YaST modules have been used to build the directory:
-
Network Services > LDAP
Server was used to create the directory
and set-up the base DN (dc=example,dc=com).
-
Network Services > LDAP
Client was used to configure the system
to authenticate against LDAP users. It also added the ldapconfig
organizational unit, and was used to create the userconfiguration and
groupconfiguration objects.
-
Security and Users > Edit and
Create Users was used to add the people
and group objects, as well as add the admin user.
With this
knowledge, it is easy to see how to configure a system that has already been
installed so that it hosts LDAP users; simply use the modules given above to
configure the system to have a similar directory. By default, SLES is already
installed with a directory (usually dc=site, if no domain was configured in the
network settings) containing LDAP users. Just add a new directory or change the
current directory so that all new users have a UID of 10,000 or higher, then
place the home directories of new users in a location other than /home.
Now that the base
system is installed, the following configuration is performed:
-
If the server is
to be used to authenticate Windows users, it must be configured as a PDC.
-
If the server is
to be used to authenticate Linux users, a NFS share must be created to share
the home directories.
-
The users and
groups must be added and configured.
Configure as a PDC
Configuration of a PDC is a relatively simple task.
Start by opening the Samba Server YaST module by selecting Network Services
> Samba Server. A pop up may appear stating that additional packages may
need to be installed. Select Continue to install them. Begin by entering
a workgroup name, such as EXAMPLE. Next, indicate that this server should act as
a Primary Domain Controller. The next screen has several configuration
tabs:
-
On the Start
Up tab select On to enable the Samba server on boot.
-
On the
Shares tab change the users share to point to the new home
directory path, such as /users.
-
On the
Identity tab do the following (see Figure 8 for a summary of all
settings on this tab):
-
Give the server
a NetBIOS Host Name such as ldapserver.
-
Indicate that
this sever should have WINS support.
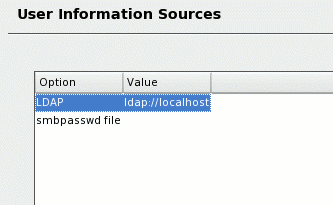
-
Select
Advanced Settings > User Authentication Sources. Add LDAP as a
source then move it to the top of the list (see Figure 9).
-
Select
Finish. The settings are written, and a prompt requests the LDAP
password. This seems redundant because it was already set in the previous
step. The step was necessary or the next step, setting the Samba root
password, fails.
Figure 8:
Settings on the identity tab
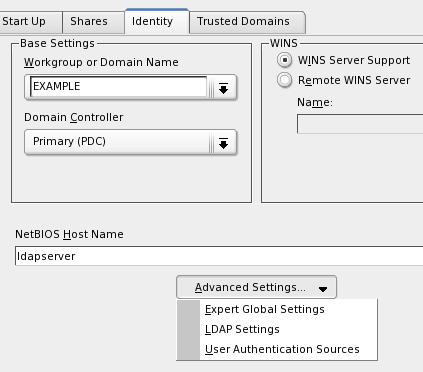
Figure 9: LDAP as
an information source
Now, perform
another ldapsearch. Notice that there are several additional Samba entries in
the directory. This module did the following:
-
Started the Samba
server and configured it as a PDC.
-
Linked Samba with
LDAP so that LDAP users can be authenticated through Samba.
-
Established
several Samba shares, including a share for user home directories.
Configure a NFS share
Linux workstations
are capable of authenticating users directly via LDAP. However, a share must be
created to allow the client workstations to mount the user home directories. The
easiest way to do this is with NFS.
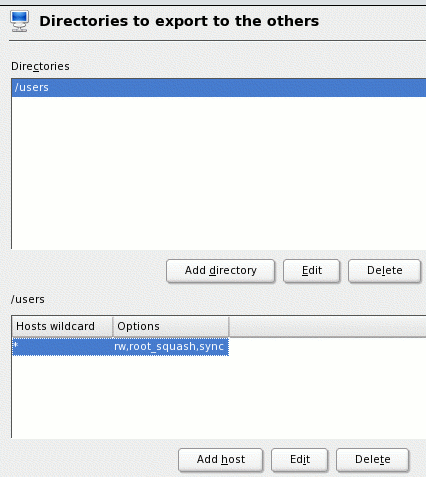
Begin by starting
the NFS Sever module in YaST by selecting Network Services > NFS
Server. Select Start NFS Server and proceed to the next screen. Here,
NFS shares are added. Select Add Directory to create a new share. Enter
the directory that the user's home directories are stored in, such as /users. A
pop up allows for the configuration of hosts that can mount this share, and
options for the share. This NFS share will not be password-protected so it is
best to restrict the hosts to only those within a specified IP address range.
See the exports(5) man page for more information on how to do this. This
share also needs read/write access, so change ro to rw. Figure 10
shows a summary of the NFS share settings.
Figure 10:
Configure the NFS share
There are two ways
that the client computers may mount the home directories. The first, and
easiest, is to simply add this share to the /etc/fstab file on each
client and have the entire /users directory mounted on each client. If this
method is chosen, configuration on the sever stops here.
The second method
is to configure automount to automatically mount only the home directory
of a particular user as they log-in. This is much more elegant and secure, but
requires more work on the server. This work involves creating automount objects
in the directory, and adding users to these objects.
For example, to add
the admin user to the directory, the following entries are required:
#First, create objects to define the
automount directories. These need only be created once.
dn:
nisMapName=auto.master,dc=example,dc=com
objectClass: nisMap
nisMapName: auto.master
dn:
cn=/users,nisMapName=auto.master,dc=example,dc=com
objectClass: nisObject
nisMapName: /users
cn: /users
nisMapEntry: ldap
137.65.211.18:nisMapname=auto.users,dc=example,dc=com
dn:
nisMapName=auto.users,dc=example,dc=com
objectClass: nisMap
nisMapName: auto.users
#Then, add an entry for each user. As new
users are added, new entries are required. For
#subsequent users, remember to change the
user name in 4 places.
dn:
cn=admin,nisMapName=auto.users,dc=example,dc=com
objectClass: nisObject
nisMapName: admin
cn: admin
nisMapEntry:
-fstype=nfs,hard,intr,nodev,nosuid 137.65.211.18:/users/admin
Save these entries
to a file, such as nfs.ldif. Enter the information into the directory
with the following command:
ldapadd -x -D
cn=Administrator,dc=example,dc=com -W -f nfs.ldif
Add and configure users and
groups
Now, it is time to
add additional LDAP users and groups. To do so, enter YaST then select
Security and Users > Edit and Create Users (or Groups). Notice that
the LDAP password is prompted for. Also notice, in the upper right, that
custom filter is selected. To filter only local users or only LDAP users,
use the Set Filter button on the lower right.
In Part 1 of this
article, example.com has three departments and five employees. A good
configuration could have three groups for each department, and then place
employees to these groups. First, add a group. Make sure the
Groups radio button is selected in the upper left, then select
Add. Enter a group name, such as Sales. Notice that existing users
can be added to a group as it is created. Select Next. Here, additional
LDAP and Samba plug-ins are added. For Samba to recognize this group, highlight
Manage samba group parameters and select Add or Remove Plug-In. A
fuzzy box appears on the left, indicating it is added (see Figure 11). Use this
same process to add other groups, such as Marketing and
Engineering.
Figure 11: Adding a Samba group

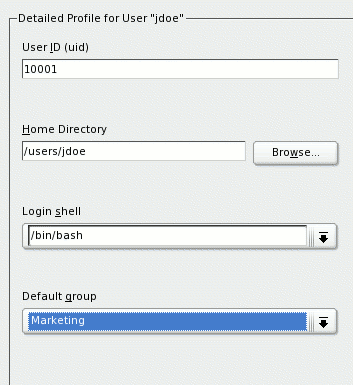
When all the groups
exist, add some users. Make sure that the Users radio button is selected
on the top left and select Add. Enter the user information just as the
main admin user was added. In Details, remember to change the home
directory to the proper path, such as /users, and select the group this person
belongs to (see Figure 12).
Figure 12: Detail
Settings
Again, the next screen allows for configuration of
the LDAP and Samba plug-ins. Launch the LDAP plug-in and add an e-mail address,
phone numbers, etc. Then, add the Samba plug-in, and launch it. In order to to
have the user's home directory mapped in Windows and enable a roaming profile,
enter the Home Drive and
Home Path as shown in Figure 13.
The home directory is mapped as U:, and the roaming profile is saved in
/user/jdoe/.
Figure 13: Samba
configuration

Add any additional
users. If the clients are to use the automounter to mount home folders, remember
to manually add their automount entry to the directory. For example, this user
would need:
dn:
cn=jdoe,nisMapName=auto.users,dc=example,dc=com
objectClass: nisObject
nisMapName: jdoe
cn: jdoe
nisMapEntry:
-fstype=nfs,hard,intr,nodev,nosuid 137.65.211.18:/users/jdoe
When completed, it
is time to configure the clients.
Configuring a
Linux Client
Configuration of
Linux clients is simple. This example demonstrates Novell Linux Desktop,
although the method is similar for any Novell/SUSE product.
First launch the
YaST LDAP Client module by selecting Network Services > LDAP Client.
The module may prompt to install some additional packages—--do so. Select Use
LDAP, and enter the directory's base DN and sever IP address or DNS name. If
the server is configured to use automount, select Start Automounter (see
Figure 14).
Figure 14: LDAP
client configuration 1
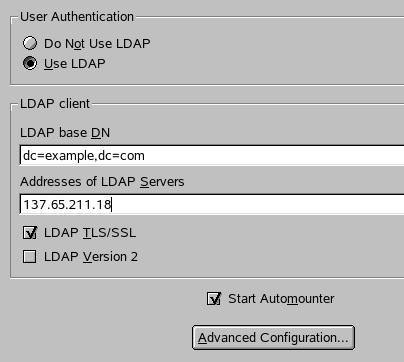
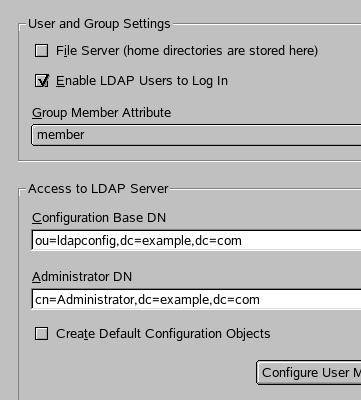
Select Advanced Configuration. Enter the base DN for the LDAP configuration and
Administrator user (see Figure 15).
Figure 15: LDAP client configuration
2
Select Next until the module saves the changes. If the server
was configured for automount, and the client has Start
Automounter checked, LDAP users should now
be able to log-in.
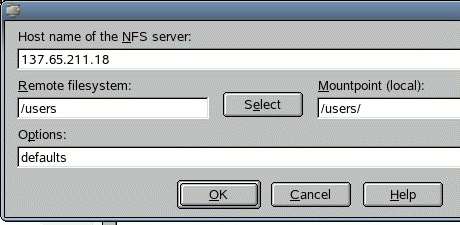
If a
simple NFS share is desired, open YaST and enter the Network Services
> NFS Client module. Add the NFS server,
making sure that the local mount point is the same as the path to the home
folders on the server. See Figure 16. This adds the share to
/etc/fstab, which mounts it on
boot. When the share is added, the users should be able to log-in.
Figure 16: Adding a NFS server
Configuring a
Windows Client
Windows clients are configured by
configuring the SLES server as a PDC. Users then select this PDC when
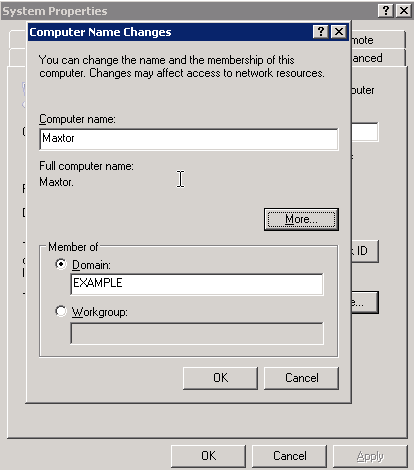
logging-in. To establish the SLES server as a PDC on Windows XP, right-click on
My Computer and
select Properties. Select the
Computer Name tab. Select
Change. Give the computer a name,
then enter select the Domain
radio button. Enter the domain that was configured in the Samba server settings,
EXAMPLE in this case (see Figure 17). Select ok. A password prompt appears. Enter the user
root and the Samba root password.
Restart Windows for the changes to take effect.
Figure 17:
Windows Domain Configuration
Upon restarting, select the EXAMPLE
domain instead of the local machine, and log-in. Notice that the Linux home
directory is mapped as U:. Open U: and change the folder settings to
show hidden files and folders. Notice that in addition to all the Linux files,
there is a .msprofile directory. Within it is everything that would be saved at
C:Documents and Settingsusername. This information is written when
logging out of Windows. Thus, any Windows workstation that this
user logs into has the same desktop settings.
Configuring a
LDAP address book
Most mail clients offer the option of configuring a
LDAP server as a source for address book information. The LDAP configuration
that has just been completed supports this. This example
demonstrates Mozilla Thunderbird, but the process is similar for most
clients.
In Thunderbird, configure a regular
mail account. Then, select Edit > Account Settings. In the left navigation, select
Composition & Addressing,
then select Use a different LDAP server and select Edit Directories. See Figure 18.
Figure 18: Thunderbird LDAP settings

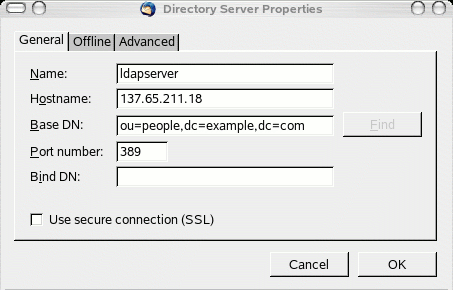
Next, enter the
LDAP server information. See Figure 19 for an example. Notice that the base DN
points to the people branch.
Figure 19: LDAP server settings
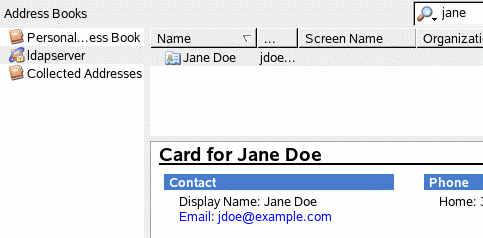
Now, a search in
the address book returns results from the LDAP directory, as shown in Figure
20.
Figure 20: Search
results
| 


