| A Little YaST Magic 
6 Jan 2005
Among the spectacular offerings of SUSE Linux is its
sensational package management tool, YaST. It removes nearly all distress
associated with managing package dependencies. That in mind, I pose a question:
How do you improve something that is already as great as YaST? The single answer
that comes to mind is as follows: I dislike having to insert or switch CDs
whenever I install software from them using YaST. I want a way to install the
software without using the CDs every time. For all those who have asked me how
to do this, I offer a solution.
Let's begin with a short overview of what we'll be doing.
First, we will save images of the CDs to the hard disk. Then, we'll mount these
images. Next, we will tell YaST where the images are mounted. Finally, we will
look at some ways to automate some of this with scripts. When finished, we will
be able to install from our mounted images any software normally located on the
CDs. No more messing with the CDs. The only requirement is that you have about
3.2Gb available on the drive where you will make the CD images.
First, let's rip the CDs to the hard disk. Drop to a terminal
and create a directory to which you will save the disc images. In this example,
we will use /isos:
Once you have created this folder, put your SUSE Disc 1 into
your CD drive. Then, execute the following command where /dev/cdrom is your CD-ROM device:
linux:/ # dd if=/dev/cdrom of=/isos/suse1.iso |
When it finishes, replace the first CD with the second, and
rip that one to /isos/suse2.iso, and so on
until you have ripped all 5 CDs. Your output should be similar to this:
linux:/ # dd if=/dev/cdrom of=/isos/suse1.iso
1329044+0 records in
1329044+0 records out
linux:/ # eject /dev/cdrom
linux:/ # dd if=/dev/cdrom of=/isos/suse2.iso
1328528+0 records in
1328528+0 records out
linux:/ # eject /dev/cdrom
linux:/ # dd if=/dev/cdrom of=/isos/suse3.iso
1332328+0 records in
1332328+0 records out
linux:/ # eject /dev/cdrom
linux:/ # dd if=/dev/cdrom of=/isos/suse4.iso
1326644+0 records in
1326644+0 records out
linux:/ # eject /dev/cdrom
linux:/ # dd if=/dev/cdrom of=/isos/suse5.iso
1323516+0 records in
1323516+0 records out
linux:/ # eject /dev/cdrom
linux:/ # |
Now that we have ripped the discs into image files, we need to
get them mounted. Create a directory to which you will mount each file. In this
example, they will be /suse/1 through /suse/5:
linux:/ # mkdir /suse
linux:/ # mkdir /suse/1
linux:/ # mkdir /suse/2
linux:/ # mkdir /suse/3
linux:/ # mkdir /suse/4
linux:/ # mkdir /suse/5
linux:/ # |
After you've created these folders, mount the images. To do
this, switch to the superuser as in the example, and run the following
command:
[2309][user@linux:~]$ su
Password:
linux:/ # mount -o loop -t iso9660 /isos/suse1.iso /suse/1 |
Run this command for each successive image, changing the
filename and target mount directory accordingly:
[2309][user@linux:~]$ su
Password:
linux:/ # mount -o loop -t iso9660 /isos/suse1.iso /suse/1
linux:/ # mount -o loop -t iso9660 /isos/suse2.iso /suse/2
linux:/ # mount -o loop -t iso9660 /isos/suse3.iso /suse/3
linux:/ # mount -o loop -t iso9660 /isos/suse4.iso /suse/4
linux:/ # mount -o loop -t iso9660 /isos/suse5.iso /suse/5
linux:/ # |
Now, all the CDs are ripped and their images are mounted.
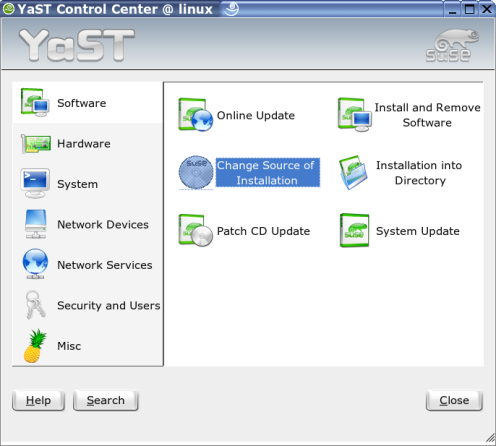
The next step is to configure YAST so it knows where to look
to find the packages. Run YaST, and go into "Change Source of Installation:"
Select the first option, and then click on the "Enable or
Disable" button. This will change the "Status" column to "Off:"
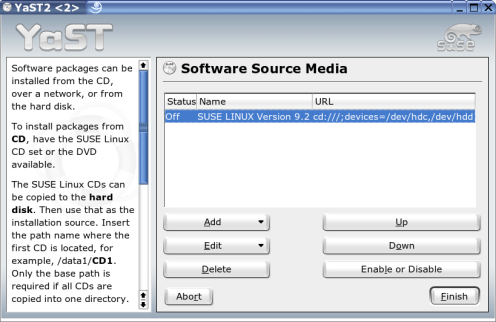
Next, click on the "Add" drop-down box, and select "Local
Directory."
A small window will appear asking in which directory it is to
look. Type in "/suse/1" and click "OK:"

Do this for each of the images. If a warning appears, it is
safe to click "Continue." When you are done, your screen should look like the
image below:
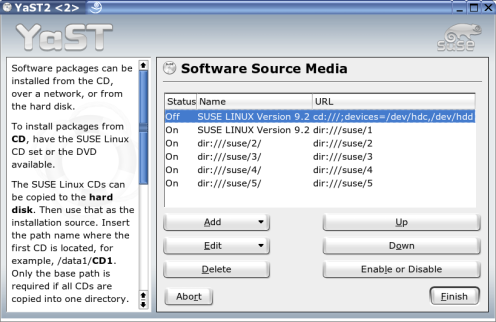
Click "Finish." YaST now knows to look at the mounted images
instead of prompting for the CDs.
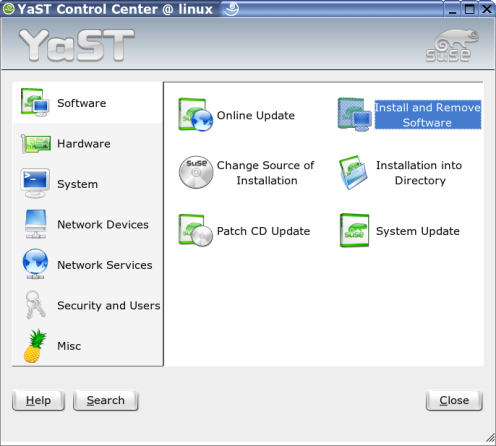
Let's test out your newly optimized YaST. If it isn't already
open, run YAST now. Select "Install and Remove Software:"
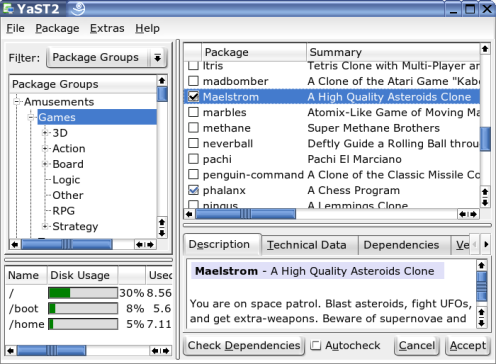
From the "Filter" drop-down, select "Package Groups." Find a
program that you hadn't previously installed, and install it now. For this
example, I used a game called "Maelstrom." Check the box next to it:
To finish, click the "Accept" button in the lower right corner
of the window. If YaST installed the program without prompting for discs, you
have done it properly and are set.
You can leave the images mounted indefinitely. However, when
you restart your machine, they will need to be remounted. So let's write a
script that will automate the mounting of the CDs for our next session.
In your favorite text editor, create a script with the
following code in it:
#!/bin/bash
mount -o loop -t iso9660 /isos/suse1.iso
/suse/1
mount -o loop -t iso9660 /isos/suse2.iso /suse/2
mount -o loop -t
iso9660 /isos/suse3.iso /suse/3
mount -o loop -t iso9660 /isos/suse4.iso
/suse/4
mount -o loop -t iso9660 /isos/suse5.iso /suse/5
Save out the script as mntimg.sh , and run the chmod
command to make it executable:
[2313][user@linux:~]$ chmod +x mntimg.sh
|
Next time you log into the machine and want to install
software, drop to a terminal. Then, as superuser, execute the script, as in this
example:
[2309][user@linux:~]$ su
Password:
linux:/home/user # ./mntimg.sh
linux:/home/user #
|
Your images are again mounted. Now, you can fire up YaST at
any time to install software. It will use your images as package installation
sources.
Once in a while, it's nice to know of timesaving procedures
such as this. Just rip your CDs to ISO image files, mount these images, and
configure YaST to use them as package installation sources. You will no longer
need to insert or change your CDs to install software. When all is said and
done, this is a great timesaver.
| 


