Posted: 11 Jul 2005
Introduction
Everyone is talking about Linux. You are an IT administrator in a company
looking to cut costs and find alternatives to the Windows operating systems. You
have heard how great Linux is and you decided to give it a try. You installed a
Linux server and client, meddled around a little and you discovered one huge
shortcoming in Linux - you can't implement login scripts. So now you have a big
problem. You know that in order for users to accept Linux, the users should have
the same or at least a similar experience as when they are using a Windows
workstation. This means that if users login on the Windows workstation and they
are able to access 5 network drives which are automatically mapped to their
workstation, they will expect the same 5 networks drives on a Linux workstation.
If the users have to manually map their network drives or if the administrators
have to do it for their users, then acceptance of Linux by users and
administrators becomes a lot harder.
Who this document is for
This AppNote is written for administrators who are thinking of making a
switch to Linux. However, it assumes that you have a basic knowledge of Linux.
This is because bash shell scripting is required to make the login script work.
While you do not have to do any scripting, and the scripts in this AppNote will
be explained in detail, without some basic knowledge you may be lost in the
explanation.
This AppNote is written for small- and medium-sized companies. This solution
is especially suitable for companies whose Windows servers are solely used for
authentication and file services. Therefore, enterprise customers may not find
this AppNote applicable to their environment.
This AppNote is written for existing Linux administrators. Hopefully, this
AppNote will make your life easier.
The currently available solution
Those who are Windows administrators know how easy it is to give users access
to network folders. Administrators configure login scripts to map the
appropriate drives and assign the login scripts to users or to groups which the
users belong to. This is unfortunately not so easy in the Linux world. So here
are the current solutions available:
- Change all network drive to be accessed through web browser.
Since
network drives are no longer mapped to users' local drives, all network drives
are accessed through the web browser. Unfortunately, users who are used to the
'drag-and-drop' method of file copying and the 'click-and-open' method of
accessing files and applications will not like the web browser approach of
file access. The web browser approach basically allows users to access their
files from the browser, but in order to modify files, files have to be
downloaded to their workstation and then uploaded after the files are
modified.
- Manually configure the FSTAB file on Linux Client.
In the Windows
environment, the server shared drives are "mapped" to the Windows client. In
the Linux environment, the server shared drives are "mounted". Since there is
no way to automate the mount point from a central location, in order to get a
server's shared drives mounted on a Linux Client, the mount points have to be
manually configured on each Linux Client's FSTAB file. The problem with this
is that users will not be able to access the FSTAB file because only root
accounts have access. So assuming that only the administrator can modify the
FSTAB file, it is extremely tedious for administrators to manually configure
each users' workstation.
- Install Client software on each Linux workstation which automatically
creates mount point.
At the writing of this AppNote, the beta version of
Novell Client is available. However, the Novell Client only does NCP mount.
NFS and Samba mount is not possible at this time.
- Proprietary Software
Proprietary software provided by various vendors
will allow users to access data stored on servers. For example, Novell has
NetStorage and iFolder. However, these applications still do not address the
need for automatic creation of mount points on Linux Clients.
Synopsis of the solution
This section explains how to get a login script to run on a Linux desktop. A
login script is basically a BASH script that will run at startup and that can be
configured centrally by the administrator. This can be done in the following
way:
- The FSTAB file of a Linux desktop is configured so that the Linux desktop
will automount an NFS mountpoint on the Linux server at startup.
- The NFS mountpoint will contain a BASH script.
- The Linux Desktop is configured to run a KDE startup script. This startup
script is actually the BASH script that is stored on the Linux server.
This means that the administrator can configure the BASH script centrally on
the Linux server and the Linux Desktop should run the script on startup. The
BASH script can be written to mount the different mountpoints for different
users or control the behavior of the Desktop. Based on this idea, this BASH
script essentially makes it a login script.
The concept sounds simple, but the devil is in the details.
Our Environment
Theoretically, this should work on any distribution on Linux. However, the
setup documented here is based on the following:
Novell Linux Desktop 9 SP1 (NLD9SP1)
SUSE LINUX Enterprise Server 9
(SLES9)
Install Open LDAP services on SLES9
Install NFS services on
NLD9SP1 and SLES9
NLD9 is running KDE
Now that we have gotten the introduction out of the way, let's start getting
our hands dirty.
Configuring the Linux Server
Create directory
- Make a directory under /etc directory called /etc/loginscript. Create
another directory under that called /etc/loginscript/secure.
- Make a directory called /mapdrives.
- Assign permission 755 to /mapdrives so that users can cd into the
/mapdrives directory.
- Create another directory under that called /mapdrives/finance. This will
represent our shared folder for the finance department.
Configure NFS services
- Start YaST > Network Services > NFS Server. Choose the
option 'Start NFS Server' and click Next
- Configure the NFS to export directories as shown below. Below shows the
creation of 3 NFS export directories. Please take note of the options.
- /etc/loginscript contains the loginscript and all necessary files to run
the loginscript
- /home/ contains the home folder which is going to be mounted on every
Linux client /home folder.
- /mapdrives/ contains the departmental shared files
Configure LDAP services
- Start YaST > Network Services > LDAP Server. Check the
option 'Start LDAP Server' and click on the 'Configure' button. If you install
LDAP services at install, the LDAP database created should follow your domain
name as shown below. In this setup, the database name is:
dc=digitalairlines,dc=com
- Start YaST > Network Services > LDAP Client. Choose the 'Use
LDAP' option.
- Click on 'Advance Configuration' button to make sure the
configurations are correct.
Create LDAP group
- Start YaST > Security and Users > Edit and create groups.
Key in the LDAP password. This should be the same as the ROOT password unless
you have changed it.
- Make sure that the the Groups button is checked and click the ADD
button. Create the 'finance' group in the GroupName and click Next twice.
- On the 'Set Filter' button, set the filter to LDAP Groups to make
sure that a LDAP group is created and not a local group.
- Click 'Finish' to complete the process.
Create LDAP user
- Start YaST > Security and Users > Edit and create users.
Key in the LDAP password. This should be the same as the ROOT password unless
you have changed it.
- Make sure that the the Groups button is checked and click the ADD button.
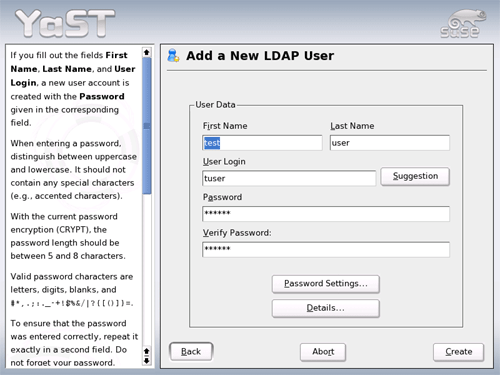
Create a test user by click the ADD button. Input the First Name, Last Name,
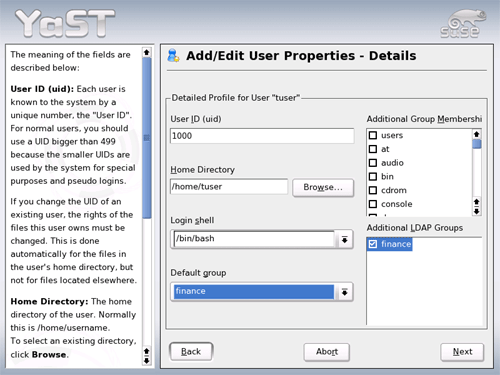
User Login, password and click Details.

- Assign the LDAP Finance Group to the user. Click Next twice then
create user.

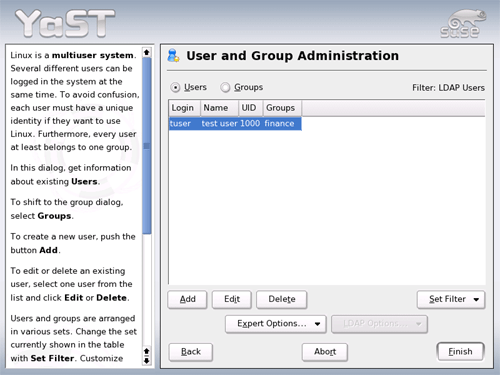
- On the 'Set Filter' button, set the filter to LDAP Users to make
sure that a LDAP user is created and not a local user.

- Click 'Finish' to complete the process.
Change Permission for CHMOD file
- Copy /bin/chmod to /etc/loginscript/secure/chmod. Set the SUID
for /etc/loginscript/secure/chmod. You can do by typing the command:
chmod u+s /etc/loginscript/secure/chmod
Configuring the LDAPSCRIPT file
- In the /etc/loginscript/secure folder, create a text file called
ldapscript. Make the ldapscript file executable. Copy the following script
into the ldapscript file.
#!/bin/bash
#LDAPSCRIPT
rm /etc/loginscript/secure/group
rm /etc/loginscript/secure/allgroup
ldapsearch -x -b "ou=group,dc=digitalairlines,dc=com" dn | grep "dn: cn=" | cut -f2 -d '=' | cut -f1 -d ',' | (
while read ldapgroup
do
echo $ldapgroup >> /etc/loginscript/secure/allgroup
echo $ldapgroup: > /etc/loginscript/secure/$ldapgroup
ldapsearch -x -b "ou=group,dc=digitalairlines,dc=com" "cn=$ldapgroup" member | grep "member: uid=" | cut -f2 -d '=' | cut -f1 -d ',' | (
while read ldapmember
do
echo $ldapmember >> /etc/loginscript/secure/$ldapgroup
done)
# This is to convert carriage return to space
cat /etc/loginscript/secure/$ldapgroup | tr '�12' ' ' >> /etc/loginscript/secure/group
# This is insert a carriage return to the EOL
echo ' ' >> /etc/loginscript/secure/group
rm /etc/loginscript/secure/$ldapgroup
done)
The above ldapscript does the following:
- Runs an LDAP Search on its own LDAP database
- Writes the names of all groups into the file:
/etc/loginscript/secure/allgroup
- Writes the names of all groups and the members who belong to the groups
into /etc/loginscript/secure/group
- The syntax of the /etc/loginscript/secure/group is the same as
/etc/group
Note: For your script to work, replace dc=digitalairlines,dc=com with
your own database name.
Configuring the CRONTAB file
- In the /etc/crontab file, add the following line so that the
ldapscript will run every minute. The reason we want this is that if the
administrator makes a change to the LDAP group and users, the
/etc/loginscript/secure/group will reflect the change:
* * * * * root
/etc/loginscript/secure/ldapscript
- Check the /etc/loginscript/secure/allgroup file. You should see 'finance'.
Check the /etc/loginscript/secure/group file. You should see 'finance:
testuser'. If you don't see either of these files, either the script is wrong
or the script is not running.
Configuring the LOGINSCRIPT file
- In the /etc/loginscript/secure folder, create a text file called
loginscript. Copy the script into the loginscript file.
#!/bin/bash
#LOGINSCRIPT
/etc/loginscript/secure/chmod 777 /etc/fstab
/etc/loginscript/secure/chmod 777 /mapdrives
cat /etc/loginscript/secure/group | grep `whoami` | cut -d: -f1 > ~/personalgroup
rmdir /mapdrives/*
rm ~/Desktop/[A-Z]drive:*
cp /etc/fstab ~/fstab

cat ~/personalgroup | (
while read mapgroup
do
    case $mapgroup in
     finance) mkdir /mapdrives/finance; echo "147.2.198.100:/mapdrives/finance
/mapdrives/finance nfs defaults,users 0 0" >> /etc/fstab; mount /mapdrives/finance; ln -s
/mapdrives/finance ~/Desktop/Fdrive:Finance;;
     *) echo;;
  esac
done )
cp ~/fstab /etc/fstab
/etc/loginscript/secure/chmod 744 /etc/fstab
/etc/loginscript/secure/chmod 744 /mapdrives
rm ~/personalgroup
The above loginscript does the following:
- It reads the /etc/loginscript/secure/group file, parses the file to find
out the group that the user belongs to and writes the result into
~/personalgroup file
- Makes a copy of the /etc/fstab into ~/fstab
- Execute chmod to change /etc/fstab permission to 777. Ordinary, this
cannot be done because chmod can only be run by ROOT. However, we are running
chmod from /etc/loginscript/secure directory which has the SUID bit set
- It reads the ~/personalgroup file and if the user belongs to the finance
group, it will:
- Make a /mapdrives/finance directory on the Linux workstation.
- Add a line into the /etc/fstab file to allow the user to do an NFS
mount. This is because NFS mount is not allowed by normal user unless the
entry is in the /etc/fstab file. **Note: Replace the IP address with the IP
address of your own NFS server.
- Create a symbolic link for the finance directory and place it on the
desktop.
Configuring LOGINSCRIPT to autostart
- Open Konqueror and under the View option, set Konqueror to 'Show
Hidden Files'
- Create /etc/skel/.kde and /etc/skel/.kde/Autostart.
- Create an application in the directory /etc/skel/.kde/Autostart. Link this
application to /etc/loginscript/secure/loginscript. This is necessary so that
every user's home directory will contain an application that will run the
loginscript when KDE starts.
Note: Theoretically, you can also create a symbolic link in a
~/.profile or /etc/profile.local to the /etc/loginscript/secure/loginscript
and the login script will still run. However, the login script will also run
when you are in runlevel3 or when you start a terminal session. This, I think,
is undesirable. The desired effect is for the login script to run only when
X-windows starts and the only way is to run the loginscript in the KDE or
GNOME startup script.
Configuring the Linux Client
- When you install your Linux Client, choose KDE as your default Desktop. If
you chose GNOME, you can always switch to KDE at the Login screen. On the
Login screen, there is a 'Session' icon. Click 'Session' and choose 'KDE
Desktop'
- Login as ROOT. This is because we need to configure the Linux client.
- Make a directory under /etc directory called /etc/loginscript.
- Make directory: /mapdrives.
- Start YaST > Network Services > LDAP Client. This configuration
should be the same as the LDAP Client configuration on the Linux server.
- Test the LDAP configuration by starting YaST > Security and Users >
Edit and create users. Set the filter to 'LDAP Users'. You should be prompted
for the LDAP password. After you key in the password, you should see the test
user that you created on the Linux server.
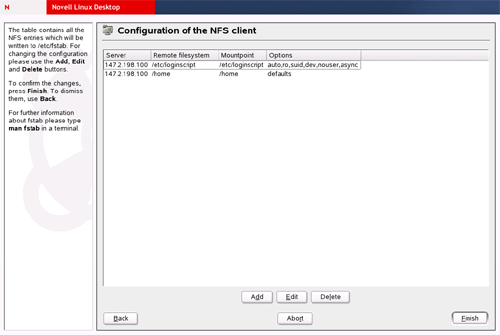
- Start YaST > Network Services > NFS Client. Configure the NFS Client
as shown. Below shows the configuration of 2 NFS mount points. Please take
note of the options.
- /etc/loginscript contains the loginscript and all necessary files to run
the loginscript. The options will mount as auto, read-only, suid, dev,
nouser, async.
- /home directory contains the user's personal data and other necessary
information required by KDE. User will not use the home directory locally.
The Linux server /home directory is mounted to the Linux workstation /home
directory. The options will mount as defaults.
The above 2
options are shown in the screen shot below.
 That's all!!! Logout as ROOT and login as test user that you created. You
should see the Finance folder created on the Desktop.
Tightening the Security
Now that you have configured the login script, you probably figured out that
this setup is not very secure. First of all, you would have realized that users
will be able to access the /etc/loginscript/secure folder. This also means that
they will be able to access /etc/loginscript/secure/chmod which has the SUID bit
set. This is extremely dangerous because it means that the users can change any
file permissions on their workstations. Therefore, we need to tighten up the
security.
- Change the /etc/loginscript/secure directory permission on the Linux
server to 711.
Changing the permission on this directory means that users
will be able to execute the login script and any other applications on the
Linux server, but users will not be able to browse the directory. The less the
users can see, the less likely they will be able to meddle with the files.
- Change the permission on all the users' home directories to 700.
This
is necessary because by default file permission is 744. Leaving the default
permission to 744 means that other users will be able to see the contents of
each users' folder. By changing the permission of the users' home directory to
700, only the owners will have access to their own home directory.
- Change the permission of the /mapdrives/finance folder to 760.
Change
the group of /mapdrives/finance to finance. This means that only users
belonging to group finance will be able to access the finance folder.
- Change the permission of the /etc/loginscript/secure/chmod and the
/etc/loginscript/secure/loginscript files on the Linux server.
Even though
the permission of the /etc/loginscript/secure on the Linux server has been
changed to 711, the users will still be able to see the loginscript if they
wanted. It is unfortunate that the file permission is not able to set as
execute only. Linux file permission as a minimum requires a read permission
(permission 4), which means that to set the execute permission, the read
permission must also be set. So the trick is to set the permission by default
to no access (700) and only when the users login, the permission is changed
only a few seconds before changing back to 700. To do this:
- Turn on logging for open LDAP server
- On the Linux server, in the /etc/syslog.conf file, add the following
line:
local4.*
-/var/log/ldap.log
- On the Linux server, in the /etc/slpd.conf file, change the loglevel to
256.
loglevel 256
Once the LDAP log is set,
every time the user authenticates via OPENLDAP, the authentication will be
logged into /var/log/ldap.log. We can then use a script to poll the
/var/log/ldap.log and every time the script detects a user authentication, it
will change the permission of the necessary files for login.
- In the /etc/loginscript/secure folder, create a text file called
changepermission. Copy the script below into the changepermission
file.
#!/bin/bash
#CHANGEPERMISSION Script
foo=1
while [ "$foo" -ne 2 ]
do
now=`date '+%b %e %R'`
cat /var/log/ldap.log | grep "$todaydate" | grep "BIND dn="uid" > /
etc/loginscript/secure/result
 if [ -s /etc/loginscript/secure/result ];
 then
 chmod u+s /etc/loginscript/secure/chmod
 chmod 755 /etc/loginscript/secure/loginscript
 sleep 60
 chmod u-s /etc/loginscript/secure/chmod
 chmod 700 /etc/loginscript/secure/loginscript
 rm /home/loginscript/secure/result
 fi
done
The above changepermission script does the following:
- Set the condition to run the script perpetually (until foo=2).
- Set the time (Date, Hour, Minute) into variable 'now'.
- Poll /var/logl/ldap.log and grep data that has the present time, and with
the entry 'BIND dn'. Redirect result into /etc/loginscript/secure/result. If
the grep command produces some result, the /etc/loginscript/secure/result file
will be greater than 0 byte.
- Test the etc/loginscript/secure/result file. If file is greater than 0
byte, then set the SUID for /etc/loginscript/secure/chmod and change
/etc/loginscript/secure/loginscript to 755.
- Wait for 60 seconds and then change the files back to default.
- Remove /etc/loginscript/secure/result file.
Limitations
- Unlike eDirectory, OpenLDAP does not allow users created on one server to
be synchronized to other servers. This means that users can only authenticate
to the OpenLDAP server on which the users' accounts are created. This means
that this method is not for enterprise customers. You can, of course, use
eDirectory as your LDAP server, but this will require modifying the LDAP
schema on your eDirectory to enable the Linux client to login. This is beyond
the scope of this document.
- Obviously, this method does not provide the greatest security. The
greatest vulnerability is the 60 seconds between a user logging in and after
the changepermission script changes the file permission back to the default.
Of course, we can always tighten up the security by reducing the sleep time
further. But bear in mind, that if the sleep time is too short, the users will
not be able to run the login script because of lack of permission.
- This script has been tested with 2 Linux workstations and it works. The
performance of this method in a production environment is not known.
Conclusion
Despite all the limitations, the login script works. Theoretically, there are
literally endless possibilities with what you can do with the login script.
Because you can change the permission of files through the chmod tool, you can
also add, modify and delete files. Since the behavior of Linux workstations is
determined by configuration files, you can also change the behavior of the Linux
desktop through the login script.
|