Posted: 17 May 2005
QEMU emulates a PC virtual machine which can be used to test operating systems and
their programs in a window on the system you are currently using. I use it to
test out the Dyne:Bolic iso before I burn it to a CD. It can also be used for
other important tasks, like running your existing OS in a snapshot window,
making and testing changes, and if satisfied committing them to the hard drive,
or like a friend of mine does, playing old DOS based games in a FreeDOS
environment.
The default RAM for qemu is 128MB, but you can increase it with the start up
command options if you have plenty to spare. There is also a speed up module
called "kqemu" which can be compiled and loaded to speed up the binary
download.
I had a minor glitch when trying to get qemu running on SUSE 9.2, in that it
needed the SDL library development files (probably sdl-config) which for some
unknown reason are not on the SUSE 9.2 CDs. I had to download and install them
from the web, so I got the latest version for both the runtime and the
development and got YaST to upgrade and install.
I think we should start at this point, as the system won't run without
them.
Point your browser to http://www.libsdl.org/download-1.2.php.
In the runtime libraries section click on
SDL-1.2.8-1.i386.rpm or follow the link. In the Development
Libraries section click on
SDL-devel-1.2.8-1.i386.rpm or follow the link.
These will be saved to your home file tree. Open Konqueror even if you are
using Gnome, as it has a nice feature for installing rpms. 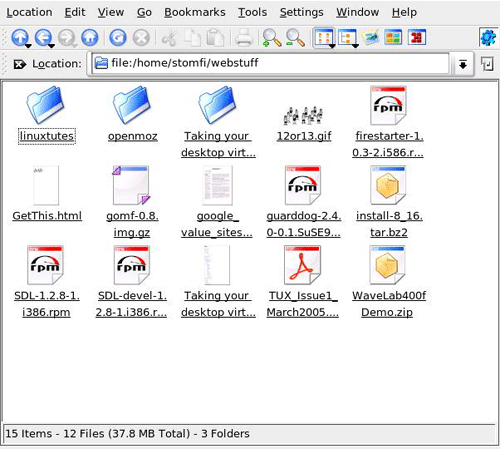
Click on the runtime file first and the window will change to a file
description with a button for installing with YaST. 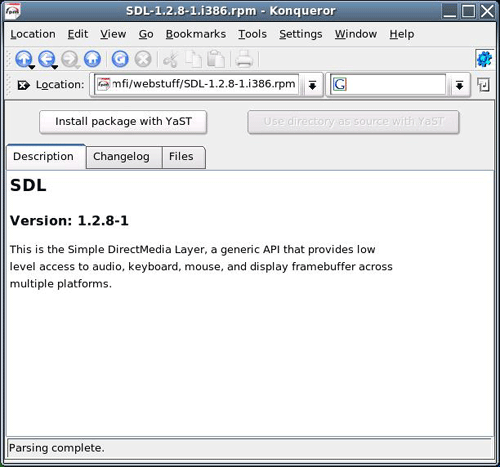
You'll have to supply the root password, and wait awhile for the package
manager to start, but it all happens auto magically. Do the same with the
development library. 
I've clicked the Files tab on this window which shows what and where the
files will be installed. The one I think is needed is there. When you have used
YaST to install this one, you are ready to start fetching the qemu files.
Point your browser to the qemu download website:
http://fabrice.bellard.free.fr/qemu/download.html Fetch
this file: qemu-0.7.0-i386.tar.gz
The comment says: Binary distribution for linux-i386 (untar it in '/'). We
shall do as it says later in this article.
Installing the Speed Up Module kqemu
I think the speed up module is worth the hassle of compiling the source, so
I'll go through these steps. If you don't want to do this, you can skip this
part and go straight to the section on installing qemu.
If you want the speed up module, you'll have to fetch it and the qemu source
to compile it, although we won't install the compiled version, just the speed up
module. These are the files:
kqemu-0.6.2-1.tar.gz
qemu-0.7.0.tar.gz
Open a terminal mc console as root and copy the two files above to
/usr/local/src. Use this command to uncompress the file.
tar xzvf
qemu-0.7.0.tar.gz
It will create a new folder called qemu-0.7.0. Enter this directory and copy
the file kqemu-0.6.2-1.tar.gz to this folder as shown. 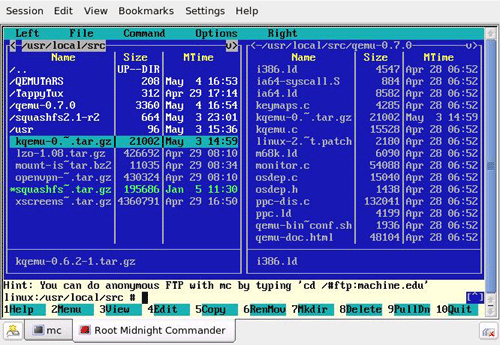
Tab to the qemu-0.7.0 folder and type the command:
tar xzvf
kqemu-0.6.2-1.tar.gz
This will create a folder in this tree called kqemu.
Type the command:
./configure
Or double click the configure command in the qemu folder. This is the
result: 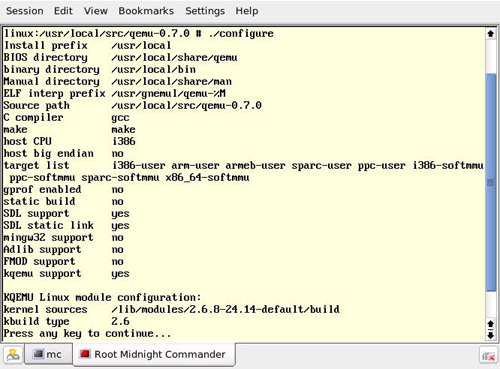
You can see it found the SDL libraries and has kqemu support. Now you can
return to the mc window and type the make command.
make
After make has finished, enter the
kqemu folder where you will see the following files: 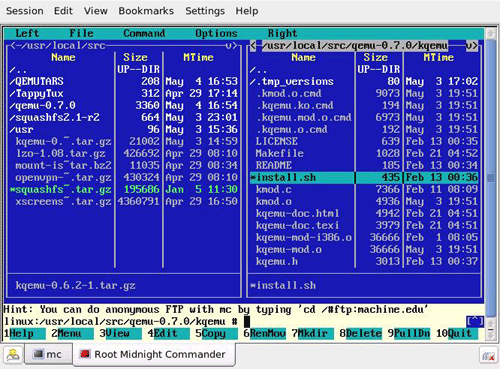
To install kqemu either double click the file install.sh or type the
command:
./install.sh
I've printed a copy of this file here so that you can see what it did. #!/bin/sh
# Installer for the kqemu module
set +e
# Find module name
if [ -f kqemu.ko ] ; then
module=kqemu.ko
else
module=kqemu.o
fi
# Find kernel install path
kernel_path="/lib/modules/`uname -r`"
mkdir -p "$kernel_path/misc"
cp "$module" "$kernel_path/misc"
/sbin/depmod -a
# Create the kqemu device. No special privilege is needed to use kqemu.
device="/dev/kqemu"
rm -f $device
mknod $device c 250 0
chmod 666 $device
As you can see it has inserted a module into the kernel modules and created a
device in the devices folder. To get this module to run, you have to give it the
command:
modprobe
kqemu
This will insert it in the running kernel. Do this every time before you
start running your qemu commands.
Installing qemu
Returning to your root mc window copy the file qemu-0.7.0-i386.tar.gz to the
root folder "/" like this: 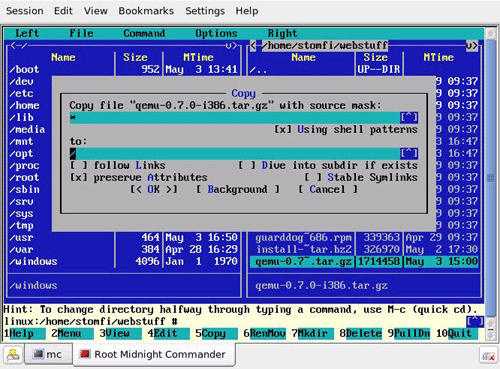
Enter the root / folder and run the command:
tar xzvf
qemu-0.7.0-i386.tar.gz
This will install the qemu programs in your "/usr/local/bin" folder and the
documentation in the "/usr/local/share/doc/qemu" folder.
If you have an iso file for a live CD you can test qemu with that. Since qemu
runs X you have to be in a terminal that will run X from the command line. Also
it is a good idea to run as root when testing so that it has all the necessary
permissions to run your hardware.
Start up an RXVT terminal from the System menu. Enter the command:
sux
give the root
password.
Now you can give commands as root that start up X Windows programs.
If you want to be your ordinary user you can give the command "sux
username"
For example:
sux stomfi
give the
stomfi password.
qemu command example.
I have a dynebolic iso so I can give the following command from the folder
that contains the iso. 
A window will open with the Dyne:Bolic boot message and startup messages.
This is the result: 
Pretty neat, don't you think.
If you click the mouse in the window you can perform actions, as if this was
the real distro running on your system. You will find that the mouse gets
trapped in the qemu window. To release it, press the Ctrl and Alt keys
simultaneously.
You can also run a distro from a CD including those that need multiple CDs
for the install. Because qemu is an emulation there are some special command
line options for getting it to recognise your network addresses and other
peripherals. Read the documentation and play with this incredibly useful tool.
It certainly adds some whiz bang to you desktop, if only to impress your
friends.
Yet Another Windowing Tool
Another windowing tool I often use when I want to use another window manager
but also want to use the default is the X Windows manager.
Using the Ctrl-Alt-F2 up to F6 keys, press a 3 key combination to bring up a
virtual terminal. Login as your user. Give the command:
startx - -
:1
This will start the default window manager on the next X Windows terminal
space, which is in Ctrl-Alt-F8.
Return to Ctrl-Alt-F7, logout and log in again picking the window manager of
choice.
Now you have two X Windows sessions running each with a different window
manager. If you have plenty of RAM and want to impress your friend with your
whiz bang Linux system, you can start more sessions like this:
Ctrl-Alt-F3 login
startx - - :2
Starts a window
manager in Ctrl-Alt-F9
Ctrl-Alt-F4 login
startx - - :3
Starts a window
manager in Ctrl-Alt-F10
And so on until you run out of virtual terminals or RAM.
If I increase my RAM to 4G, I wonder how many qemu distros I can boot
up?!?!?!
If you have used the Dyne:Bolic CD you will have noticed that it has
OpenMosix. I have several old PCs in a stack, networked together at 100Mbps. I
boot them with an OpenMosix floppy and play with them from my Dyne:Bolic CD.
They turn my stack of old PCs into a load sharing super computer. I am going to
see if I can install OpenMosix on SUSE 9.2. Wish me luck so I can tell you how
to do it. I reckon I can build an el cheapo razzmatazz games or media processing
machine. Watch this space for the result.
As you can see from this article, Linux is a great platform for doing your
own thing, your own way. Not like the other follow the sheep system. I hope it
gets installed in every educational facility in our world, so we can get on with
being people again.
|